Topics

Tuesday, December 30, 2014

Mad Plaid Shirt Dress - McCall's 6885

Pattern: McCall's 6885 (2014)

Pattern Description: Semi-fitted, pullover dress with collar, collar/front band, front pleat, pockets, tie ends, and rolled sleeves with button tab.

Pattern Sizing: Size B5 (8-10-12-14-16) View D. I cut out a size 12 bodice, sleeves, and a size 14 from the waist down.

Did it look like the photo/drawing on the pattern envelope once you were done sewing it? Yes, exactly!

Were the instructions easy to follow? Yes, they were. I was initially worried about the front placket but it wasn’t as difficult as I thought it might be. Everything else was pretty self explanatory.

What did you particularly like or dislike about the pattern? I like the casual feel of the dress, how you can just throw it on and be well dressed.


Fabric Used: 2 3/4" yd Plaiditudes Brushed Cotton in Blue, Green and Brown, $4.99 per yard from Jo-Ann Fabrics; Gutermann 100% polyester thread in Green #748 and Deep Turquoise #630; Gutermann topstitching thread in Cranberry #435; four 5/8” buttons from La Mode in red #4359 and two 5/8” teal buttons from my late mother’s stash.

Pattern Alterations or any design changes you made?: The only difference is that I decided to eliminate the shirt-tail hem and just take it straight across.

The instructions called for interfacing in the placket, tabs, and collar. I put together the tabs first without interfacing and liked the thickness. I did choose to use it on the front placket because it would be buttoned and unbuttoned continuously. However, I decided to cut new pieces after realizing the fused fabric would be too stiff to turn them inside out, despite it being a light knit interfacing.

The placket instructions were simple and clear. The only problem I had was my own fault. The plaid on the placket piece did not match or complement the front of the dress. I totally missed the fact that I needed to add plaid match lines to that pattern piece too. Unfortunately, I didn't have enough fabric to reposition the piece or cut it on the bias so it looks a bit weird and interrupts the matched plaid that I do have from the front pattern piece. I did however; remember to cut the front breast pockets on the bias.

The biggest problem I had with this project is how easily this fabric distorted and the plaid would get off grain visually. I had to sew the pockets on twice despite having already basted them in place first. Because of the aforementioned problems with the plaid and distortion I chose not to use the red topstitching thread on the placket and pockets which would have highlighted the irregularities.


I was quickly moving along on this project until I noticed that the sleeves looked a bit narrow. Trying on a basted sleeve confirmed my fear... it WAS! Even using a 3/8" seam allowance, it was snug for normal arm movements and definitely tight if the sleeves were rolled up to use the tabs. I was not excited about creating a sleeveless flannel dress for winter. In addition, after noticing how the fabric frayed easily, I took apart the sleeves and completed them in tiny French seams.

Update: As it turns out, the sleeve width will be fine as long as I don’t layer the dress over another top (like I originally wanted). When I wore it Christmas day, I left the sleeves full-length instead.

The fraying fabric inspired me to create flat-fell seams at the shoulders and side seams as a way to extend the life of the dress and make the interior attractive.

Flat fell seams at shoulder and side seams
There was also a bit of hand-sewing (which I love!) included in this project, the inner seam of the collar, the plackets, and the sleeve and skirt hems.

Forgive the wrinkles!
Buttonholes scare me! I’ve avoided putting them in project for years and with this one, I didn’t even cut them open when I wore it the first time. I sewed the bottom two buttons on top of the buttonholes and left the top two open. I also didn’t cut open the sleeve tab buttonholes either. If I can avoid ever cutting them open I will.


Would you sew it again? Would you recommend it to others? I may, only if I use a solid fabric, and I would go up one size for the sleeve pattern piece.

Perfectly accessorized with a earlier handmade cowl. 

Conclusion: I was immediately attracted to this view when I first saw this pattern but I didn't think of making it in a plaid flannel until I saw this shirtdress by Grainline Studio and became obsessed. Now, I have my own because of the power to make your own clothes!

Monday, December 08, 2014

Bit By Bit...Piece By Piece...

putting it together *

McCall's 6885

Having no time to do any intensive sewing, like on that front placket, I have been completing the little pieces...one at a time. I now have the waist ties, pockets, and sleeve tabs together, stitched, and pressed. Now moving on to the sleeves and collar...

Dec. 11 update:

2:00 pm

Hurray! Placket is stitched onto front but there is some handsewing to do on the back and then some topstitching on the front. Topstitched the pockets and sleeve tabs. In process of putting together non-interfaced collar and band now. It's starting to come together!

5:30 pm

Handsewing of plackets done, bottom of placket stitched, and front pleat in position.

10:00 pm

Stopping for the night with collar and band stitched together, edgestitched, and pockets basted in position.

Dec. 18 Update!

Looks just like the sketch above! It only needs buttonholes (five in all) and the hem. Hurrah!
*"Putting It Together" by Stephen Sondheim

Friday, December 05, 2014

Sewing Plans...They Never End, Do They?


Yes, a new wardrobe plan! The projects that I didn't finish last winter/spring have migrated to this new grouping along with two new projects. Happily, the most practical (and boring) one is already done, the work-related button-down shirt.

Now, I will be consecutively working on the shift dress (once I get a handle on the fitting issues!) and the plaid shirtdress. I spent yesterday cutting out the plaid and I'm hoping the shirtdress can be worn in a few weeks for the holidays. The pants will be the next priority along with finishing the ponte knit dress. The duster will again be shunted to 2015 and early spring.

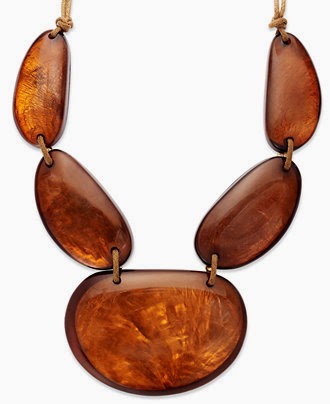
Received my xmas gift from my Dad early, and yes, another statement necklace and earrings, these are of resin and from Macy's Style & co. line. Funny, it's been years since I had new earrings too. I have been wearing the same moonstone pair everyday.


http://www1.macys.com/shop/product/style-co-necklace-brown-resin-necklace?ID=688597&CategoryID=55285&zone=PDP_ZONE_A&choiceId=cidA40011-d793fd11-9a87-4336-a85d-a8d66796be13@H7@Customers Also Shopped$55285$688597&LinkType=PDPZ1_Pos1 http://www1.macys.com/shop/product/style-co-earrings-brown-resin-earrings?ID=688595&CategoryID=55285&zone=PDP_ZONE_A&choiceId=cidA40011-22d001ff-527f-46c8-a2cb-9c32d21e5804@H7@Customers Also Shopped$55285$688595&LinkType=PDPZ1_Pos1

Friday, November 28, 2014

Fashion In Film: Funny Girl (1968)

Director: William Wyler
Barbra Streisand, Omar Sharif
Music: Bob Merrill, Jule Styne
Costume Design: Irene Sharaff

Hel-lo Gorgeous!
As a child, I first saw Barbra Streisand in this movie; the love story of Fanny Brice and Nicky Arnstein, and I thought she was one of most beautiful women I had ever seen. I remember being shocked to find later that most people did not think she was attractive. Luckily, looking at the film later, I still believe in my first impression. In this film and in the flashback scenes in On A Clear Day You Can See Forever, it is obvious how regal and elegant Ms. Streisand was. Not only did the clothes flatter her figure while still being close to the fashions of the period in which the movie is based, the makeup and hair enhance her unique good looks of oval face, almond eyes, high cheekbones, and aquiline nose.


The movie begins depicting the ingénue Fanny Brice as she tries to break into vaudeville. One of the first things we see her in is a public schoolgirl smock, meant to illustrate her youth and innocence. Despite that, I find the white version of this top very interesting because of the drape of the fabric, it looks luxurious to me.


Her big break , "I'd Rather Be Blue", comes after she participates in an embarrassing early performance on roller skates. What I took from this costume is the unique color combination of moss green and blue striped velvet with a purple tulle skirt trimmed in satin with a matching sash. Not to be too sedate (ha!), it is also decorated with huge bunches of plastic grapes.


Fanny's big break comes when she is highlighted in a bridal skit as a beauty while her own self-consciousness takes the skit from schmaltzy romanticism to a shocking and funny conclusion, which almost results in her being fired. In the movie, this makes her a comedy star.
 
The happy couple.
While that performance makes her a star it also wins her an admirer, the wealthy, suave, and wickedly handsome Nicky Arnstein (Omar Sharif). This is where the true FASHION of the movie begins. The clothes she wears as his lover and then as his wife are gorgeous. My favorite pre-marriage is the fussy purple dress (blue chiffon over purple satin) worn for her seduction in “You are Woman, I Am Man.” It is over-the-top because of its color, ample cleavage, sequins, beads, and floral embellishments; it even includes a voluminous bubble-skirted upper half ending in a hobbled skirt.


Clearly in this movie, designer Irene Sharaff chose to put the sartorial focus on Ms. Streisand’s nape and decolletage. Most of the formal dresses in the movie feature low scooped or squared necklines, much lower and more exposed than the true fashion of that time.

Movie version
http://www.liveauctioneers.com/item/321200
The Broadway stage version
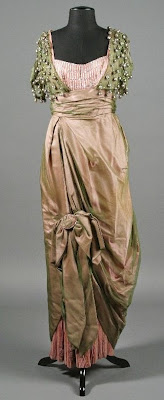
The "People" dress above was designed in olive green silk marquisette over pink satin which gave it an iridescence.

  http://www.liveauctioneers.com/item/321198

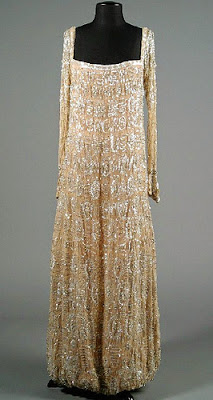
Another favorite is a dress that seemed to have been dipped in diamond dust. Accessorized with a matching clutch and headband, the dress just glows on film. As you can see above, while the dress is gorgeous when on display, it truly transforms itself when worn by Ms. Streisand.

http://www.liveauctioneers.com/item/321198 http://www.liveauctioneers.com/item/321198

As described on liveauctioneers.com: Full length, long sleeved evening dress with a low cut bodice and empire style waist. Constructed in layers, there is a fine silk under-shell with an overlay of chiffon netting encrusted with sequins and rhinestones. The very bottom of the dress has a layer of crinoline and a double layer of silk under dress giving the bottom a full appearance. The sleeves feature snaps as does the entire back of the over-lay. 


The photography and design of the "My Man" scene is again done to her great advantage. Dressing her in all black velvet with a black background and a lone spotlight on her torso, her skin seems as alabaster as her pearl drop earrings. The lighting and framing help make the already emotional song even more dramatic and powerful.


Everyone remembers the barge scene of "Don't Rain On My Parade" but what about the rich marmalade orange of her ensemble? Perfectly coordinated with the yellow roses in her bouquet and her brown sable or mink hat and muff, the two-piece wool outfit with Nehru collar was cropped at the front waist but constructed like a frock coat with "tails", The zig-zag overlapping tiers of the skirt followed the hobbled silhouette of the times and really show when she frantically runs for both her cab and for the boats. The dress was also tested in emerald green which I may have preferred when shown against the blue tug boat. I also think the color may have been more flattering for Ms. Streisand's complexion.

http://barbra-archives.com/films/funny_girl_movie_cut12.html


http://barbra-archives.com/films/funny_girl_movie_cut12.html

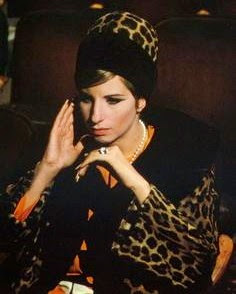
How strange that she is also wearing the same color combination as when they finally decide to call the relationship quits. Now in the 1930s, Franny is wearing a Sonia Delaunay-inspired dress in pumpkin orange, black, and white, with a long rope of pearls. It is worn under a leopard and black fur coat with matching hat. 
Miscellaneous costumes:
http://www.liveauctioneers.com/item/321201
Worn when touring their new mansion.
A "housedress"
 

*Costume information from liveautioneers.com

Also see this piece on the Le Cinema Dreams blog. 

Thursday, November 20, 2014

Got The Blues Work Shirt - Built By Wendy (Sew U)


Pattern: Built By Wendy button-down shirt from the Sew U book (2006)

Pattern Description: Slightly-fitted, button-front shirt with separate collar stand, sleeve placket, and buttoned cuffs. Pattern options include yoke, collar, front facing, and pocket customizations.

Pattern Sizing: XS-Large. According to the book's size chart I should make a Large (size 10-12 ). I ended up cutting a Medium from the shoulders to the waist and then tapering out to the Large for my hips.


Did it look like the photo/drawing on the pattern envelope once you were done sewing it? Surprisingly, yes, since I refashioned the shirt from an existing RTW man's shirt.

Approximately what my shirt originally looked like
Were the instructions easy to follow? As I was working from a completed shirt, I can't say that I used many of the book's instructions on this version. However, the instructions read clear to me.

What did you particularly like or dislike about the pattern? It was a more simplified version of the button-down, this version eliminated the back yoke detail. The pattern also included shaping for a feminine shape. However, the best thing about this shirt pattern and instructions were the many ways the shirt could be customized.

This is the true color*.
Fabric Used: A thrifted man's shirt in a wrinkle-resistant! cotton poplin ($5), thread, and Pellon Easy-Knit (AK130) fusible knit interfacing.

The "After"
Pattern Alterations or any design changes you made?: First thing first, I had to cut the shirt down to my proportions using the Sew U pattern. That involved my trusty seam ripper and I took apart the side seams, removed the cuffs and took apart the flat-felled sleeve seams. I then cut out the shirt fronts aligning the pattern hem with the existing finished shirt hem. The original shirt came complete with a self-lined yoke and back pleat. The shirt was so much larger that these were not touched in the pattern cutting and were both removed.

In fact, I cut the new band from the discarded yoke and cut the new collar from the original shirt's collar. I reused the original collar's interfacing and retained the finished top edge.


I cut the new sleeves from the originals lining up the pattern edge with the original sleeve hem edge; therefore, retaining the finished sleeve plackets .


I adjusted the new sleeve width by adding a tuck so that the sleeve could slip inside the original sleeve cuffs. I then added a new line of topstitching to secure them there.


When attaching my band collar I realized the length was a bit off so I created a small tuck on the back neck. This kind of tuck is usually used beneath a yoke but was my only option since the band matched the length needed for the collar.


Update: After trying this on I didn't like the way the area puffed up under the collar. I removed the stitching from that collar section and instead created a faux center back seam by taking 1/2" out of the back width tapering down to 1/4" at the hem.


Would you sew it again? Would you recommend it to others? Yes, after I adapt the center back pattern piece for less width and extend the side darts a bit more for shaping. I was pleasantly surprised that no easing was needed when inserting the sleeves, very impressive drafting.


Conclusion: I love that I was able to refashion this shirt and retain all of the detail of the button plackets and topstitching detail. The shirt was quick and easy to make because of this but the fit is due to the Sew U pattern and I will make more of these, even from scratch!

* Unfortunately, most of my pictures were over exposed and none captured the true color.