Pattern Description: An above mid-knee flared skirt with lined yokes, side front and side back seams, and back zipper. Skirt length is around 20-22". Design by DKNY.*

Did it look like the photo/drawing on the pattern envelope once you were done sewing it? Yes
Were the instructions easy to follow? Yes, very much.
What did you particularly like or dislike about the pattern? I love that it is a lovely flared skirt in a substantial weight and perfect for black boots or heeled oxfords. The corset-like shape of the waist yoke is a great detail.
Before Construction: First thing, first, I cut and ripped the drapery panels to make sure the fabric was on grain. I did this on all four sides. I decided to keep the tabs in case I might want to have belt loops on the final skirt. I removed all the buttons from the tops of the panels, 32 in all (16 marbleized one with Nautica written on the "right" side but unmarked on the reverse and 16 clear backing ones for stability) Because these drapes had been up in my apartment for years, months at a time, there was a lot of visible sun fading on the sides facing out. Before I cut the pieces, I had to make sure that the front of the panels used were not affected.
Pattern Alterations or any design changes you made? I was going to cut the skirt longer, but after measuring the skirts in my closet, I realized the 21" finished length should be perfect.
The inside yoke before attaching the lining.
After stitching together the seven pieces for the waist yoke and attaching them to the skirt I was able to wrap the project around my waist. No final garment measurements were provided for this skirt, so there was no knowing how much ease was included. To adjust the width, I decided to cut 1/4" from the back seam allowances, effectively eliminating 1/2" from the skirt circumference before sewing in the zipper.
I fused the woven interfacing to the skirt yoke pieces. This was the first time I've used this type and I really like it, if gives a nice stiffness to the fabric and it fused extremely easily and adhered well.
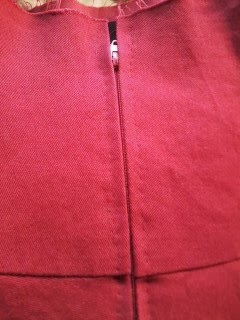
After basting on the zipper by hand I decided I liked the minimal look and used a tiny prickstitch, so this is as close as I get to an invisible zipper. Pretty good, right?It was time to attach the lining. For this skirt, only the yoke is lined so I attached the yoke lining pieces at the top and then folding the edges under I slipstitched the lining over the waist seam and to the zipper tape.
Finishing the skirt; at least for all my skirts, means a hand stitched hem. I prefer handsewing to an obvious stitched line around a skirt. A great tip that I can offer is to use your sewing machine as a hem guide. For a 1-1/2" hem, sew a basting stitch around the hem at the 1/2" mark, this will be the first fold. The stitching gives you the perfect "straight" edge and does half the job for you. Now, you can use a combination of finger pressure on the fold line and steam from an iron to press the fold and shrink out the excess fullness. I find it more enjoyable than using a ruler, a hot iron, and vulnerable fingers to slowly press around a huge circle, measuring all along the way. This way, I just remove the basting threads afterwards. Easy peasy.
 |
| Excuse the extra line, which I just ignored. |
Would you sew it again? Would you recommend it to others? Yes, I would. This was meant as a quick project with minimal fitting needed and that's what it turned out to be.
 |
| Modern knit skirt from Zara with a similar shape. |
Conclusion: I love it, a nice swingy red skirt. Funny thing is that I now own four solid red pieces in very similar shades, but different enough that none can be worn together.
*This pattern was secured free during the VA/DC/MD blogger swap!


