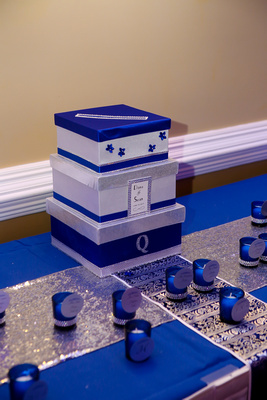
Time to discuss the details that made this card box stand out and grab attention. At this point, the boxes had been covered in fabric and were ready for the next steps but first, here is a bit of background on how I made the decision about exactly what fabrics to use and how they would be arranged.
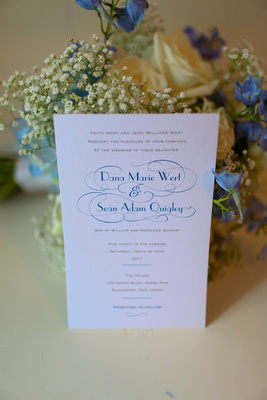
I knew I would be using the colors gray, cobalt/royal blue, ivory, and silver, to represent the groom and groomsmen in light gray suits, bridesmaids in blue dresses, the bride's dress, and her rhinestone sash/belt, seen above.
I bought some appropriate swatches from Jo-Ann; two stretch satins, a stretchy metallic performance fabric, and a fabulous patterned brocade that combined cobalt, navy, silver, and white. I desperately wanted to feature that last fabric, unfortunately, the bride wasn't as into the brocade as I was. As you can see in my mock-ups below, I had originally thought of using it to cover an entire tier...well, that was vetoed. I thought it was the perfect addition to cohesively tie the colors together. Eventually, I found a way to incorporate it into the overall design.
I had spent time with the swatches playing around altering fabric position, amount of color coverage, and proportions. Now the practice box used to trial my fabric covering shenanigans was put to use to preview different types of surface decoration.
For your information, here again is the list of all items and tools I used in my card box project. This post focuses on the decorative items.
Materials:
- Darice 2849-06 Paper-Mache Square Box Set, 8/9/10" 3-pack from Amazon $12.49
- Darice paper-mache square box, 4" x 4" $1.50
- AMAZLINEN sequin table runner, 14" x 108" in silver $11.99
- 1 yard Casa Collection stretch satin in White $10.49,
- 1 yard Casa Collection stretch satin in Dazzling Blue $10.49,
- 1/4 yard Brocade floral stripe in Royal/Navy $1.75,
- 1/3 yard Mystique performance fabric in White/Silver, all from Jo-Ann Fabrics $6.37
- Celebrate It 360 5/8" satin ribbon in Royal $3.99
- Recollections 5/8" white ribbon with white polka dots $1.00
- Offray 7/8" wire-edged ribbon in Royal $5.99
- Two Bead Landing Sticky Gems Value Packs in clear crystal rhinestone $4.99 (2)
- Dovecraft Essentials crystal self-adhesive letter Q $1.00
- Offray 5-petal violet ribbon flower with pearl in Royal $1.99
- Elmer's Multi-Purpose Spray Adhesive $6.99
- Elmer's Washable School Glue Stick $.95
- Aleene's Original Tacky Glue $.69
- Olfa 45mm rotary cutter
- Emery board (or sandpaper, of course)
Total: $87.66
First lesson learned
I bought the
wired ribbon first because it was the only one in stock that matched my satin fabric, the other ones were definitely royal, which is a brighter and more primary shade of blue than cobalt. The wired ribbon was horrible for this task because it would not lay flat against the box and the Aleene's glue soaked through and could be seen, even after it had dried. Luckily, this was all on the practice box, so for the real thing I bought a glue stick instead.
Note: Though we decided to try for a simple and more classic design, there were definitely a lot of amazing trims out there that could have been used. I found semi-sheer glitter covered ribbon, wide ribbed grosgrain, and ribbons covered with glitter dots, or made of metallic silver. In addition, there was this 4" stretch sequin paillette trim and many varieties of rhinestone-type- trims.
Bling
Now it was time to bring in the bling! I ended up loving these self adhesive gems, they were so easy to cut apart and position. This was the least stressful step of all. I used my rotary cutter (again with an old blade that I no longer used on garment fabric) to cut apart the rows and also to make neat the ends. I applied it along the bottom edge of all the boxes by first wrapping a complete strip around the corners and filling in the resulting gaps with pieces, making sure to line them up so it appeared seamless.
My favorite part is the very top, I saw that detail on another box and knew I had to do that here. It took the thankless card entry and elevated it to a design feature.
Ribbon
After Michael's restocked, I was rewarded with some non-wired "royal" blue ribbon and a novelty mini-roll of white satin ribbon to use on the bottom blue box. I wasn't thrilled that the white had white polka dots painted on it but it was only a dollar and the other whites didn't match
my white satin. I still was unable to find either colors in a wider width (3" would have been ideal) at the time but vowed to make it work.
Next step was applying a row of satin ribbon right above the rows of gems. I first wrapped the ribbon around a box to get the correct length and then pressed under about a half inch at one end. I started each strip at the back seam, overlapping the pressed end over the cut edge. I also made sure that this was the same corner that the fabric closures were so that those sides would face the wall of the venue, leaving the pretty sides out.
This time, attaching the ribbon was SO easy! Since I was using a glue stick that would dry clear and was the same width as the ribbon, I ended up applying the glue directly to the satin, being careful not to go outside of that dedicated strip area. That entire bit of decorating took less than an hour.
More Bling
I had been unable to find the wider ribbon that I wanted and I thought the boxes looked unbalanced with too much unadorned space. Since I had more adhesive trim, I applied another row of the gems above the ribbon to give those boxes a finished look.
Signage
Using this Pinterest image as an example I chose to create a label for the card box with the bride and groom's names, and their wedding date. This was a low key detail. I had designed their wedding invitations using Vistaprint and wanted to use the same fonts and design elements for this sign. I created another draft invite with only this text and planned to print it out and use. However, the ink coverage was not good on the print.
So I taped the printout and some cardstock to the window and traced the text onto the card. It was messy up close but once I added two rows of rhinestone trim for a border it looked much better!
Flowers (nixed)
There was a time when I thought about assembling some fabric flowers as additional decor on the box tiers. This brought me back to the brocade fabric because it mixed the royal with silver, some white, and a darker blue, bringing everything together and I saw it as giving the original basic fabric trio an elegant and opulent feel.
My first thought was as fabric roses or carnations (both used in the bridal flowers); however, the brocade I wanted to use for them started to fray as soon as you looked at it, let alone be manipulated in turns and folds! I changed track to use satin ribbon but couldn't find wide enough satin ribbon in the
right blue to make the roses. But if
you want to make some gorgeous ribbon roses, here are two instructional sources that I found:
Ribbon Rose Tutorial by The Flower Art
DIY Satin Ribbon Rose by daisyclub23
To be honest, the production of them stressed me more than I needed. In my mind they had to be near
perfect and I didn't have the patience for the amount of practice needed for me to be satisfied.
Runners
Luckily, I had other ways to amp up the visual interest. In addition to the card box I had been tasked with decorating and setting up the gift table. I purchased a nine(!) foot long silver sequin table runner from Amazon at the same time I ordered the boxes. It was gorgeous and perfect and would be placed lengthwise on the blue tablecloths provided by the venue. With the box already decorated in cobalt blue, white, and silver; the sequins amplified the bling factor.
This picture of the practice box placed on the silver runner and brocade gave me the idea of using the brocade to construct a runner that would be placed perpendicular to the sequin runner and perhaps hang off the table, with maybe a decorative tassel on the end? I saw this as a means of compromise with the bride, this way the fabric could tie all of the visual elements together yet
not be part of the actual box.
My goal was to create this from the 1/4 yard I purchased as a "swatch", I didn't want to buy more fabric and saw this as a way of also justifying that prior expense.
I originally thought I had to figure out how to achieve a perfect point on the ends. Even though a runner is one of the simplest item to make, my fear of messing up this expensive fabric prompted me to look for a tutorial and lucked out with
this one by Little House Living that involved
NO math or precise cutting! Just four simple seams that I complicated (of course!) by having to not only piece the back for length but by also cutting the back wider to create a contrast border for the front.
After a lot of pressing took place while trying to match the width of the border on each side, I tacked the triangles down in the back and was done.
Portability
The best advantage to the way I constructed this tower of boxes is that the individual boxes and lids were left separate. They would be assembled at the venue using mini clothespins I purchased over ten years ago, attaching each level to the next one. The sequin runner would be lain down, the brocade runner next, the box tower placed on top, and then the sign would be attached. A picture of this was sent to the bride and the project was...approved!
That structure in the picture above is approximately 10" x 10" and 5" tall, as large as the biggest box, and just like a Russian nesting doll, all the other boxes were stacked inside. There was also enough room inside for both runners, the package of clothespins, the little sign, and extra ribbons and tape. So, so convenient!
I was more proud of this project than I should have been knowing that it had no real use after June 10 but I will look at it as evidence that I never do a (forgive my language) half-assed job on anything!
Compare what I produced to what I was asked to make:
What I learned:
- I highly support the compact portable option, it was so easy to break down and carry at the end of the night.
- Make sure your receptacle can be secured somehow or have someone on guard...this can be a lot of money! Of course you should trust your invited quests but what about their plus ones and any temporary event staff?
- Overestimate how many cards you will receive...their gift table was practically empty with only three wrapped gifts because everything else went into the card box! Making something more like this 2' tall box found on Etsy probably would have been more appropriate:
If you are reading this because you searched for DIY wedding card box tutorials I hope I have helped you or at least led you to some helpful sources.
Good luck!
DIY Wedding Card Box Part 1 - Base
Images: BMG Event Group, my own image,
DiamondDecor on Etsy, my images, BMG Event Group,
jamiekimdesigns and the
MadeSoPretty shop on Etsy