Showing posts with label technique. Show all posts

Sunday, October 23, 2016

Sewing CAN Be Simple


Sewing can be as simple (or as complicated) as you make it.

Sometimes, I feel bad because I don't have an overlocker but after reading Overdressed by Elizabeth L. Cline, I'm perfectly fine with not trying to emulate the ways of current clothing manufacturing (ie. fast fashion) My knit fabric seams are still zig-zagged and then fortified with a second line of stitching 1/8" away and then trimmed close. Most of my woven seams are either pinked or the seam allowances are folded under and secured.


My hand stitched hems are a highly deserved piece of pride that I carry. These are blind and they are invisible while also sturdy and hard-wearing. I have not had any give up when I needed them.

Another way that I veer from the norm is that I have never installed an invisible zipper. I started out sewing more than twenty years ago with centered regular zippers and they have never (NEVER) in that time failed me. Just the thought of consciously installing an invisible zipper that from blog accounts seem to frequently break is perplexing enough to keep me from even trying them. Knowing that I have this deficiency in my sewing knowledge does bother me sometimes; however, it's largely fine by me because having a completely invisible zipper isn't a priority for me.

In fact, I've played with the color of my zippers at times. If it was not possible to have a perfect color match, I would choose one that complements or contrasts with the fabric on purpose. Ex. burnt orange and navy blue, lemon yellow and gray, or when using a floral print with a white background I would instead match one of the other colors.

Saturday, July 09, 2016

A Public Service Announcement Re: Sergers

Sewing blog misconception #1:

Reading "I can't wait to get a serger so that I can start sewing knits!"

WHAT?

I read this over and over in the comments of sewing blogs. Where has this idea come from, that you must have a serger before you can even attempt to sew knit garments?

Reality: You Do Not NEED A Serger

The truth is people have been sewing up knit garments on standard sewing machines for years with no problems. Even though the overlock (the stitch that a serger produces) was invented in 1881 and the machines that primarily use it have been in existence for over a century, their use was predominately industrial for decades. Nowadays, knits can be made up well using either a simple zig-zag stitch (my personal favorite), the simple overlock or stretch stitch available on the majority of sewing machines, or a dedicated stand-a-lone serger.
 
In my opinion, there is only two reasons to use an overlocker to sew knits: 1) If your desire is for the insides of your garments to have a finish like the insides of RTW garments. 2) You desire a way to construct knit garments fast and in bulk. I understand that desire but just not enough to make me pay for a separate special machine that can range in price from $200 to several thousand dollars. So, I want it made clear especially to those just beginning to sew or striving to sew on a budget that they can start sewing knits NOW without making that particular financial investment and still be extremely happy with their makes.

I use a practically vintage 1993 Babylock Companion BL2100 sewing machine (I would like to upgrade eventually) and I am incredibly proud of my knit makes. It took some education since I started sewing 20+ years ago but since having learned 1) not to let any part of my knit fabric hang off any surfaces and to 2) help feed the fabric through instead of pulling it, my hems have been just as uniform and flat as any of my woven hems. In other words, it can be done.

After a while, if you still want an overlocker, then by all means do your research and find the one right for your purposes and wallet. Just don't feel that the lack of one should hold you back. Thanks for listening and keep on sewing!

Sunday, April 13, 2014

Book Review: Sewing Lingerie (1991)


As part of the Singer Reference Library, the Sewing Lingerie book from 1991 covers lingerie construction from fabric, lace, and elastic selection to how to construct beautifully detailed custom lingerie.

For the lace instructions covers lace overlays, appliqué, motif matching, and lace insertion techniques. I was amazed by how thorough and extensive the information all presented with step-by-step photos. While I lack the motivation or inclination to make my own lingerie past simple knit underwear, this book should be all that is desired for anyone else to take on the task. Other things included are how to cut woven fabric on the bias and takes you through the construction of basic bikini briefs to slips, tap pants, teddies, dressy robes, kimonos, and flannel-lined silk robes.

For a more thorough review, check out this one by Renee from Miss Celie's Pants.

The fact that the book is long out-of-print should not be a negative. Though the book can still be found in some local libraries, the book can also be found through numerous Internet booksellers. I purchased two other volumes of this Singer series (The Perfect Fit and Sewing Pants That Fit) from Alibris.com for only $.99 each! Though I might not see myself using this book to its fullest, I will probably locate and purchase a copy just for the individual techniques. Therefore, I highly recommend this book.

Wednesday, April 09, 2014

Book Review: Sewing With Knits (1992)


Sewing With Knits (1992) is part of the brilliant Singer Sewing Reference Library series and covers construction of knit garments from A to Z. The book explains fabric types, care, how to select the right elastic and all the seam finishes you would want to know in order to make your garments look professional, there are no wavy seams here!

Some of the things covered in this volume:

  • How to sew knits, from interlock to stretch velvet to two-way stretch fabrics
  • Eight different ways for finishing necklines (p.36-45)
  • Create perfect knit plackets and welt pockets (p.76-79)
  • Five different elastic waistband treatments (p. 90-95)
  • Construct neat and tidy buttonholes using fusible web (p. 109)
  • Blocking sweater knits (p. 20)
  • Dealing with knits fabric that have nap such as velvet, velour, stretch terry (p.104-105)

Two really cool tips too good to keep secret:

  • The best overlock thread colors to have are not neccessarily black and white, look what can be accomplished with just an off-white, gray/taupe and a rosy shade of red (p. 23)
  • Lining the knee area to prevent baggy knees in knit pants (p. 60-1)

In addition, a special section on swimsuits and leotards (pages 112-123) shows how to:

  • Adjust paper patterns for swimsuit torso adjustments
  • Apply elastic or elastized binding
  • Create partial linings for swimsuits
  • Constrict bandeau top linings with or without bra cups
  • Produce professional elastized straps

Last but not least, I am again impressed with how well all the information is presented with clear step-by-step photos.

This book is long out-of-print but can be easily found on Etsy, eBay, and used book sellers like Alibris.com and Amazon. If you're lucky, you can also find it in your local library like I did but I think you will probably do better to get your own copy. Watch out for overpriced copies though, I've seen them listed for far over $20(!) when I found my own copies of other volumes in this series (The Perfect Fit and Sewing Pants That Fit) for only 99 cents each! Don't get hoodwinked. I highly recommend this book and now that I have read five books in the series, I will be looking out for the rest of them too.*


*Tailoring (1988), Sewing Activewear (1987), are a few I am interested in.

Sunday, January 05, 2014

The 2014 Wish List

Happy New Year!!

Last year, I said I wasn't going to set myself up for stress by making any definite sewing plans. But, we all know, the planning is the best part of it all! So, here's some of what I would like to attempt in the next six months or so. There will be some finishing up of earlier planned projects like that Simplicity 6656 duster coat and my turquoise Moss skirt; however, I now have more primary priorities in place (career & debt) but these things are what I would like to spend my "free" time thinking about.

Starting with a few small things:

Create a black knit turban for bad hair days using this free tutorial. Done!
Stitch up a practical corduroy clutch purse using a free Fabric.com/HotPatterns download. Done!
Make a full skirt made from Vogue 2747 using my now unneeded red poplin apartment curtains. Done!
Attempt Simplicity 5287, a vintage funnel neck dress, in free green double knit.

Projects I want to try:

Last year, I posted an inventory of the handmade wardrobe items that I still wore from my own closet. I still have quite a few RTW items in my wardrobe. Well, I don't believe in getting rid of stuff before it's been throughly used and bordering on threadbare; therefore, I got thinking...how about altering or embellishing all my RTW pieces and reclaiming them in my own style, so that any Me Made Mays or such would have an advantage?

Why not try reverse applique such as that done by Alabama Chanin. I feel like taking apart some of my RTW knit items, restitching them with raw seams, and adding simple stitched embellishments like this. You know...reclaim the handmade from RTW! It's another way to increase the handmade garment/accessory numbers in my wardrobe. Luckily, I've got lots of embroidery floss from my Wee Wonderful doll supply stash and I also have ribbon and inherited button collections from numerous "no longer with us" personages.

Start on my muslin for the Colette Clovers. I took apart these H & M stretch woven pants in order to make a pattern and will compare that with the Clovers to help mitigate any problems using the Colette pattern.

Muslin and create the Built By Wendy Sew U pants. The fact that they were referenced by Sallie as the basis for these jeans is all that I need. If these work, I won't need to go purchase that popular Jalie jeans pattern.

I would like to try out these Shelby Kaava #302 Vuokatti leggings using this free downloadable pattern or trying out this tights tutorial from Handmade By Carolyn. I find I treat my store bought tights harshly and I hate the expense.

Underwear and more underwear! I also have my eye on this DL01 balconette foam bra by Make Bra. The best thing about it besides having no underwire is that you can cover the cups with woven fabrics which will make it a stash-buster. *Bonus from moving: I discovered many discarded t-shirts that I wouldn't wear again but could use for these.

Oh! and I will also be participating in Stash Diet 2014, since all the projects above will be supplied from my existing stash. I won't be posting specific goals or fabric counts but you are free to check out my stash (with fabric content and amounts, if possible) on Flickr here.

Friday, March 22, 2013

Fashion In Film: Brave (2012)

Director: Mark Andrews, Brenda Chapman, Steve Purcell
Kelly Macdonald, Emma Thompson, Billy Connolly
Costume Design: Connie Chung

Two of my loves together: Sewing + Animation


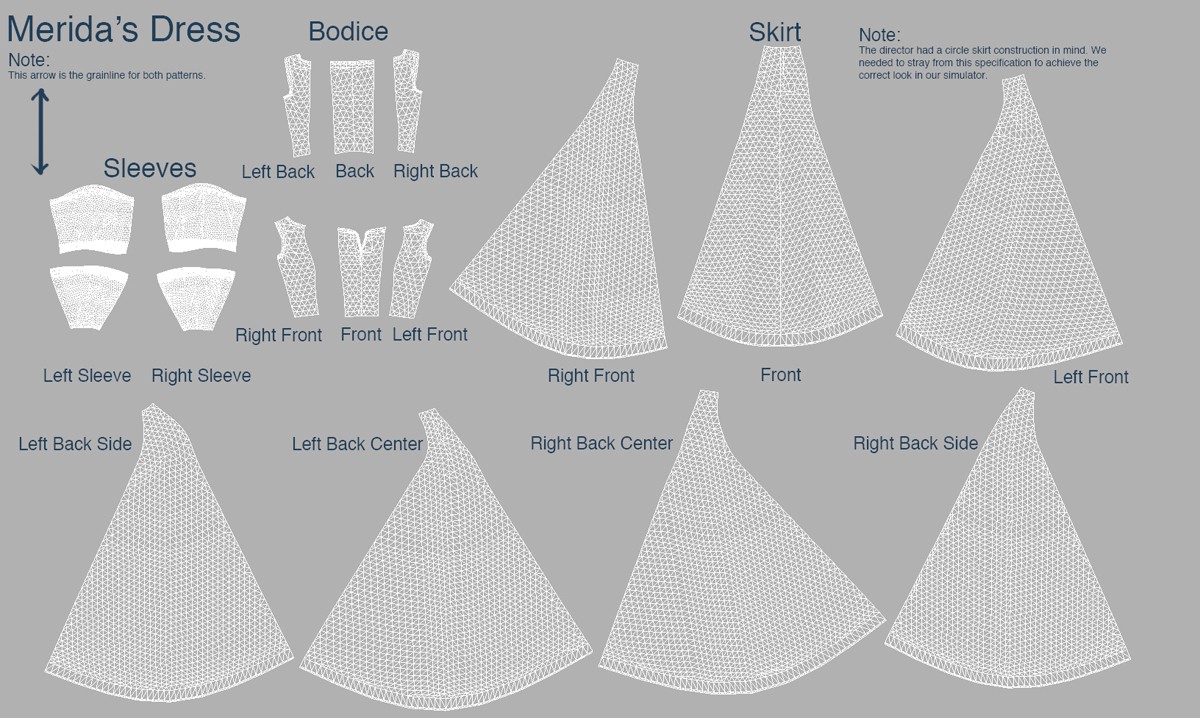
I first wrote about it here regarding the movie Coraline and just recently read this fascinating article from the blog Clothes On Film about how the costumes of Pixar's Brave were created using computer simulation and their industry's form of "sewing".

Connie Chung, Simulation Supervisor on Brave:

"Basically, at Pixar, what we do is model the garments in 3D and then we have a proprietary software we use to essentially sew them all together. {...} There are sometimes features like the frills on Merida’s dress or her sleeves; we wanted to use the traditional techniques of gathering so we still “sewed” them on."

Yes, and to be aware of those gathering techniques, the studio actually hired digital tailoring artists who have previous experience in traditional costume design and dress making or have taken sewing classes in order to know how fabric weighs and drapes. Most definitely a skill that would be invaluable when modeling with wool tartans I expect.

Step 1. Costume design sketch

Step 2. Digital "sewing" pattern for Merida's dress!

Step 3. Garment fully realized.
Also related and equally as fascinating is this story on Babble about the clothing process and this article from FX Guide on rendering the ferociously curly hair of Merida, the lead character and the realistic fur of the animals in the film.


Images: Courtesy of Disney Pixar

Follow my blog with Bloglovin

Monday, October 22, 2012

8. Summer End Tops - Vogue 9772 (OOP)

Pattern: Vogue 9772 (OOP) from the VogueElements line, c. 1997

Pattern Description: Two bias pullover tops: 1) fitted, v-neck with bodice seaming, side slits and 2) loose-fitting, scoop neck with back extension to upper front (to be worn over first top).

Pattern Sizing: Available in XS-XL (6-22). I made a M (sizes 12-14).

Did they look like the photo/drawing on the pattern envelope once you were done sewing? Yes


Were the instructions easy to follow? Yes, very much.

What did you particularly like or dislike about the pattern? It was very easy to put together, though I ended up making it more involved by underling the fabric and using French seams throughout. I liked that the visible seaming on the front of each top was topstitched.

Fabric Used: 1) Multi-colored (orange, gray, white, tan, ruby red on an off-white ground) Prairie Rose Swiss dot fabric from Joann, $4.85. I bought the very last bit, actually less than the 1-1/4 yards needed according to the pattern. 2) 1-1/8 yards of Daphne batiste in papyrus, $12.48 for the overblouse and enough left over to completely underline top 1.

Pattern Alterations or any design changes you made:

Top 1: Originally this top was going to be one layer, but luckily I had purchased enough of the coordinating batiste that I could underline all four pieces. This Vogue Elements top is a simpler variation of a Marc Jacob pattern, Vogue 2068, that was released the very same year. I made a version of that top years ago. The necklines are different and the Jacobs pattern used French seams throughout. I wanted that same quality so I incorporated the French seam construction for this top too.

It is hard to see but the pieces are basted using intersecting diagonal lines.


Since I was going to use French seams I thought I should also use the correct method of underlining according to the Reader's Digest Complete Guide to Sewing. This method has you reposition the underlining because that layer should be slightly smaller that the outer layer to reduce bulk.The technique involves hand basting and the spine of a thick magazine, pretty cool!


Once that was done, the rest was easy, I just followed the seaming instructions from the earlier pattern. Once I made the first French seam at the shoulders I decided to baste the rest of the top together and see what I had. The V-neck was really too low; you can see that in the drawing but I thought that was an exaggeration.  I ended up taking that seam out and taking one inch off both the front and back pieces. This not only brought the neckline and armholes up but also put the waist curve of the pattern where it should be, at my actual waist. There was also an issue of a bit too much length in the front armscye, so instead of cutting out a replacement front I added an ease line and lightly eased/gathered some of the length out.


Top 2: There couldn't be an easier pattern or instructions. Again, I incorporated French seams to match the other top which will be worn under this one. Despite using the instructions from Vogue 2068 I decided to start with a 3/8" seam first and then 1/4", the reverse of what they indicated. This top assembled quickly with tiny 1/4" hems and seams all-around. The batiste ended up being a really nice fabric, in look, feel, and weight.

Would you sew it again? Would you recommend it to others? Perhaps. I did end up making alterations to the garment during construction until I was satisfied and unfortunately, I did not transfer those changes to the pattern pieces before completion. I would highly recommend this pattern if you can find it online.

Conclusion: I love how both of these tops came out with a flattering fit and clean interior finish. However, at least from the way that I made them, the second top does not really work as an overblouse to the first one. It is too bulky. However, it works as a perfect complement over the original Marc Jacobs top, which it matches in color. So, win-win.

Wednesday, October 10, 2012

I Won A Giveaway!


Patternmaking by Dennic Chunman Lo
I can hardly believe it! I rarely win things and definitely not things that I really REALLY wanted. But this time, I did.

Thanks to the generous giveaway last month by Shams of Communing With Fabric, I won a fabulous copy of the above book, Patternmaking by Dennic Chunman Lo, the director of the Creative Pattern Cutting program at the London College of Fashion. He is also the designer of his own Lo and Cabon label.

The thing I love most about this book is that it provides a detailed step-by-step guide to creating the basic pattern blocks for a bodice, sleeve, skirt, dress, and pants along with information on how to create patterns above and beyond the rules, ex. the book's cover photo. This book looks at pattern making as it applies to the actual human body by giving written and photographic examples of  the body's range of motion and the considerations that must be drafted into a block to accommodate them. There are no complicated formulas to memorize and everything is created by using true body measurements. Although, the book uses a standard English size 12 in the examples all you need to do is replace those measurements with your own.

Patternmaking is part of the Portfolio Skills series of books for student designers (architecture, advertising, fashion, etc.) that are written by top professors at leading art and design schools. They are all published by Laurence King Publishing, Ltd.

For more information on his course, click on any of the links in this post. You will find more detailed reviews of the book on the Flossie Teacakes and Fashion Incubator blogs. In addition, you can also check out this video by Mr. Lo himself:


Pattern Cutting by Dennic Chunman Lo from Laurence King Publishing on Vimeo.

Tuesday, October 02, 2012

Alabama Chanin and Sewing Patterns

I wanted to let you in on something I noticed a few weeks ago that I think is fabulous. You know Natalie Chanin, right? I've written before about her and even have a link to Amy Palanjian's blog posts about her jersey wedding dress made in collaboration with Chanin's workshop. (Check it out, it's awesome, especially if you love hand sewing, which I do!)

However, have you seen this?

On the Alabama Chanin website, they have a weekly post called DIY Thursdays where they present projects that you can do at home using her techniques. What caught my attention were the posts where Natalie took the intricate and hand sewn details that abound in her clothing line and transferred them to the construction of designer sewing patterns from Vogue (Anna Sui, Vena Cava) and independent designers like Anna Maria Horner.

It's amazing to see the same garments that Vogue makes up in slinky patterned knit and shiny silk fabrics now made up in soft organic cotton jersey with exposed seams, visible hand stitching and sometimes elaborate appliqueing. What she accomplishes with Vogue 1175 (see Vogue's taffeta version below) is amazing. I suddenly want to buy this pattern and make it in a knit. Let's say I was not impressed by it in the stiff, shiny stuff but in a knit jersey it hangs completely different and looks so comfy.


Here are a few of the other patterns that Ms. Chanin choose to replicate, (click on the captions to see the Chanin versions on her blog.)


Images: The McCall Pattern Company, Alabama Chanin

Monday, September 17, 2012

My First Quilt Is Done!


Unfortunately, the sun wasn't out the day we photographed, so here it is held up in the fluorescent lighting of my office. I hadn't named it before but I will now, the Moneta d'oro (the Golden Coin) quilt.

Instruction:

I am so happy that I took this class, I highly recommend it. You learn the correct techniques for making a slightly larger than crib-size quilt  (35" x 49") based on the Twisted Coins design in four 2-hour sessions. All of the instructions for this and fourteen other quilts were from the book, Piecing the Piece O' Cake Way by Becky Goldsmith and Linda Jenkins. This book was required for the class and I also recommend it.

Front

Back
Expense:

In total, the project cost more than I expected, even with my store discount. You see, I had never gotten around to buying a rotary cutter and mat before this. However, I was able to purchase the mat, rotary cutter, and a "6 x 24" quilt ruler at a 50% discount from Joann's for $46.00 with some of my graduation money.*

The fabrics for the front (1 large piece and six fat-quarters) and thread cost $27.00. The next purchase (white quilting thread, batting, and fabric for back panel) cost about $29.00. Required notions like a walking (quilting) foot, curved safety pins, and a pack of needles totaled $29.00. So, in total, this project cost me $131.00 or $89.00 not including the items that I would have probably bought anyway; the rotary cutter, mat, needles, and white thread. Oh, and I have enough fabric left to make a matching quilted pillow or bolster to coordinate with the new Moneta d'oro throw on my couch.


I can't remember right now, but I have a post on here that listed things I wanted to accomplish. I can now check off Make a Quilt!

* Thanks Aunt Teresa and Erica

Images: courtesy of Joanna Wilson-Green and myself

Monday, August 06, 2012

My First Quilt

Well, I am finally taking that beginning quilt class offered by my part-time job. The style of quilt I will be doing has changed because I am taking a different session. But this is better because I don't have to go in on Saturdays and then go back and work at the same place the next day. It would feel like I had no weekend at all. This class, tomorrow evening is after my full-time job. I'm more used to that having taken so many night classes over the years.

Twisted Coin Quilt
I will be making a variation on the classic coin quilt which will provide me with some experience in block piecing, sashing, binding, and actual hand/machine quilting.

This is the fabric that inspired the colors I chose.

Though my apartment is made up of strong bright colors, this collection of fabrics, Citron Gray, has intrigued me ever since I started working at the quilt shop. The line is by Michael Miller Fabrics and has proven very popular in the store, we also have a display quilt using these same fabrics. Because of that display, the line has become very popular. I had to quickly make up my mind which fabrics I needed and how much of each so I could buy my fabrics before any of it sold out. Also, to add some graphic variety to my choices I included a graphic black, gray, and white stripe from the Riley Blake Tuxedo collection for something non-spherically based.

Click image to see fabrics larger.

All of the fabrics in the middle of the above image are the ones that I settled on. Not pictured is the dark gray that will be the quilt backing because I might change my mind and buy up the white on dark gray polka dot for that if it starts to look too busy. Also not clear in the picture is a mild light gray print that I couldn't find a larger picture of, it is not just gray. The majority of the quilt, the background, will be the white fabric with the tiny black dots, and the "coins" will be made from those other six little bundles (fat quarters).

This quilt was also a perfect reason to finally buy a rotary cutter and mat, which conveniently I was able to buy with some graduation money. I can't wait to start!

Monday, July 30, 2012

My Sewing Library UPDATED

Almost three years ago, I wrote a post listing all the sewing books that I had at the time. Since then, I have accumulated a few more including some quilting books too.

Posts about some of my other book additions are herehere, and here. In addition, I didn't write about receiving the Colette Sewing Handbook as a birthday present.

Today, I'm writing about the last three garment sewing books that have joined my collection:

Vogue Sewing Book, 1982 edition - My sister bought this for me from a library book sale. It's not as cute and kitschy as other sewing books from the other pattern companies, but it is very comprehensive. I recently used their instructions to create a blanket-stitched thread loop to corral a button on the back of a blouse.


The Perfect Fit: The Classic Guide To Altering Patterns, 2005 (Also published earlier as The Perfect Fit, 1987, as part of the Singer Reference Library*) - This book is very comprehensive and easy to understand with clear pictures and explanations. You may have heard of this book, it is highly recommended by many sewing bloggers. However, when I tried to find my own copy I found it difficult to track down which one they were talking about.

So, in order that you won't have to go through what I did: the book was published twice, once as part of the Singer Reference Library series of sewing instruction books and again separately on its own with no reference to Singer. However, it is the same exact book (see below), they even share the same cover image.

Sewing Pants That Fit, 1989, part of the Singer Reference Library - This one was a bonus when it was advertised on Alibris.com for only .99 cents! I had only meant to buy the book above but how could I resist one specifically on pants, especially since I have FIVE pairs of pants on my To Do sewing list.


Hopefully, I can keep this "sewing book problem" down a bit. I still want the English language versions of all three Drape Drape books but I could settle for access to them through a loan or a library. I have not found a store that carries them. Basically, I would just like to riffle though the actual books myself. Tempted to see if my part-time job would special order them as they have carried a few other Japanese sewing books: Cut-Up Couture, Shape Shape, I Am Cute Dresses, and Simple Modern Sewing.

UPDATE: Just found another printing of The Perfect Fit with a new updated cover, but it still has the same old photos. Basically, if the sewing book is called "The Perfect Fit", it is probably this same book.  

 
*The Singer Sewing Reference Library - I already own one book from this series of hardcover books so I already knew how clear and concise the instructions would be. I highly recommend this series.

Tuesday, April 03, 2012

No Time For A Real Post...

Here are some random thoughts:


  • I bought a 24 inch flexible curve ruler at Office Depot just for making pants!

  • Does anyone know where to get scalloped shears instead of pinking shears? They are supposed to be the best at thwarting unraveling fabric seams.

  • Too many projects, can't focus. Are you feeling the same way?

  • Just how many sew-alongs are actually going on right now? Mad Men Dress Challenge, OWOP, Handmade Wardrobe, Sew Colette, etc.

  • Have you checked out the block/sloper drafting series over at Madalynne? So excited to try them out.

  • Wouldn't it be fabulous if everyone felt this way? (Say goodbye, trolls!)

  • Who else is scared about Blogger's upcoming new look?!

Tuesday, November 08, 2011

Taking A Measure...

Sorry, no progress to show. All of my garment construction has been happening in my head...I have been researching fitting and adjustment materials to improve the fit of my garments.

I was first looking for info on narrow back adjustments for the coat, which lead to looking in those same sources for remedies to the fit issues of the Colette Pastille (too-long bodice, narrow back adj?), my potential Colette Clovers (full belly adj, crotch length, sway back?) and instructions on grading my Vogue 1922 pants pattern up two sizes.

It led me to decide to wait a bit on alterations. The research led me to the conclusion that what I really needed to do first was the basics: I needed to record my personal measurements. This is also the first step to drafting my own patterns.

To help others here are some sources I have found interesting:


  • Texas A&M AgriLife Extension Service Pattern Alteration series


  • Threads articles on measurements


  • Sew Stylish Ready...Set...Measure!, p. 80, Volume 1


  • Fast Fit by Sandra Betzina


  • Kwik Sew Measuring and Pattern Alteration Guide


  • Design It Yourself Clothes: Patternmaking Simplified Taking Your Measurements, p. 30.


  • The biggest thing I found was that different sources have different ideas on what "the" essential measurements are and also have different ways of correctly measuring them.

    So I am going to pick one source and follow through with that system's plan for doing adjustments since those personal measurements are essential to make the correct changes. I will be using the AgriLife Extension series for both my measurements and for alterations for Vogue 7714, the Pastille and the Clovers. I will use the Threads instructions to grade up my Vogue 1922 pants pattern.

    The best thing is that once I have my measurements recorded I can compare them to paper patterns and make some changes even before the first muslin is made.

    Save time and fabric? Sounds good to me!

    Monday, October 24, 2011

    Vintage Sewing Books I Want!

    I borrowed two great sewing books at my local library this year (multiple times).

    All-around Sewing Reference


    Note: Same book, different editions: 1961 and 1970 (they removed the tag-line). The 1970 edition was available in a metal binder version, see below.

    Better homes & Gardens Sewing Book (1961)


    What's I found cool inside:

    The book shows five different ways to make a sheer overdress with an opaque inner slip that also formed its own foundation garment. The instructions included details on how to construct the inner corselet for each dress. The construction is a little different depending on how the outer sheer dress was to be attached to the inner slip.

    Drafting and Patternmaking


    Designing Your Own Dress Patterns (1951)
    Designing Dress Patterns Third Ed. (1971) by Helen Nicol Tanous.

    Check out some of the styles I could create from this book (more at the link above):


    Examples of drafting projects

    Her method of moving darts is probably no different than many other guides, but her variations are what I love. The book shows things that they did when designing clothes in the 1940-50s that they don't do anymore in home sewing patterns. Besides the Advanced Vogue designer patterns the goal nowadays is easy quick sewing, with a minimum of custom details.

    I want my own copies. Onward...new mission!

    Update: Just ordered them both from Alibris!!