Showing posts with label reuse. Show all posts

Wednesday, March 15, 2023

"Three-In-One" Room Makeover

Since I moved back into my childhood home six years ago, this little 10.5' x 11' room (115 sq ft) has fulfilled two purposes; a guest room (mainly for my sisters) and my sewing room. From March 15, 2020, through the first part of 2021, it took on a new function and became my work-from-home (WFH) office. 

In the past, my sewing room could go from dull but tidy (see below) to a mass of fabric, pattern paper, and loose threads quite quickly. When I got the heads-up that a sister was coming to visit, it meant a lot of stuff would be stuffed into the armoire, into the closet, or moved to my bedroom next door. There was just so MUCH STUFF. Luckily, my go at the KonMari Method has made it much easier to keep things tidy and easily accessible, so I don't have to "excavate" stuff anymore.

So yeah, that's great, but how about not just being tidy and maybe also looking cute? I have always hated this paint color. (FYI: decades ago, this was my childhood bedroom, so at least it isn't still PINK!) I have described the current color as a "dirty bandaid," but in reality, it is Oops paint or a mistint from a hardware store or a Habitat for Humanity ReStore. An even darker and more pinky-orange-brown shade currently coats my bedroom walls. Ugh.

So guess what I'm doing? Makeover!!! Two, Two makeovers!!


I've already decluttered both rooms, decided what furniture stays or goes, and selected a selection of art that may live in either room. Not only will I be painting both rooms (they have 10-foot ceilings!), but I am also painting three pieces of furniture. Two of those pieces I have been planning to paint for longer than 10 years! For someone who LOVES to paint wood furniture, that is ridiculous! Color indecision is sometimes paralyzing. But no more, the paint is already here and waiting. 


Before: 


After:

Leviton 1-gang Midway duplex outlet unbreakable nylon wall plate in Light Almond, four for $3.08 ($.78 each.)

Behr Ultra (Scuff Defense) Coca Malt in Eggshell, $42.98

Richmond Multi Purpose Tandra Lagoon fabric from Joann Fabrics

Benjamin Moore Clover Green (2034-10) in Satin

Minwax Polycrylic protective finish in Satin

Thursday, March 19, 2020

Quick Projects From 2019

These three projects passed by last year without any fanfare, but I really like to document, so here we go...

Reuse:


I loved Simplicity 2406 so much but realized I would never be able to wear it again while also eating what I love to eat. The hip area was already bordering on too tight years ago. So, I cut it off right at the widest point to make myself a wearable top.


This gave the top some more time, but it's not the same. Since Jo-Ann still sells this fabric, I'm tempted to make that dress over again, this time in the grey version. What do you think?

Tried and True:


I made a simple skirt using a downloaded Pattern Runway skirt pattern (it seems it is no longer available) and some Jo-Ann quilting fabric I had my eye on called Dotted Twigs in a gray, mustard, and black print. It goes with everything, but of course, reads very spring, so it's been in storage.

New Make:


For Halloween, I chose to go as a superhero. Owning both the Simplicity 8718 and Simplicity 8074 "warrior women" patterns, I had a lot of pieces to choose from. The designs in these patterns resemble two of Rey's looks from The Last Jedi (with two versions of Rey's scavenger drapes,) and three costumes from Game of Thrones; a Season 7 Arya Stark battle dress and two from the Season 5 Sand Snake sisters (complete with harnesses.)


I originally wanted to use the harness ideas to create a Valkyrie costume from Thor Ragnarok but wanted something simple to make. I then thought of how achievable the character of Domino from Deadpool 2 would be instead. However, I still really wanted Rey's sleeveless vest in my regular non-superhero wardrobe, so I went ahead and made it anyway.


I was able to find a beautiful tweed remnant on the Jo-Ann clearance table and an exceptionally well color-matched lining.


Hand sewing for the win!

I'm pretty proud of this make and have worn it many times to work as a regular garment. I do still have plans to make Rey's padded epaulets (detachable) at some point with the leftover fabrics.

Friday, March 22, 2019

Deep Sea Sweatshirt TNT Win!

Well, this time I won't be doing the pattern review format because I didn't use a commercial pattern for this at all!


Needing more warm clothes for work, I chose to finally take apart a favorite sweatshirt that had outlived its use as an actual out-of-house, seen-in-public item of clothing. I mean, seriously, it looked gross even when freshly washed! The off-white fleece had turned dishwasher beige, the texture had changed, and last but not least, some type of oil (probably coconut) had spilled all over the front leaving a disgusting permanent stain. But it was so warm and cosy!

Farewell, my love...

In the picture above, it had been freshly washed. When brand new, it had actually been the same color as that pattern cutting board. Yup. What could possibly do that to a fabric?

While procrastinating about another project (so what's new?) I pulled out my seam ripper and got to work. I laid out the pieces and traced them off on my lovely Pellon Easy Pattern paper and immediately cut out a new version.


So this is essentially a rub off of a 15+ year old L.L. Bean v-neck fleece sweatshirt. Amazingly, the size tag of this one is an XS but it fits exactly as I want it to fit now even though I must be at least 15 pounds heavier than when I bought it! However, having seen how much the fabric texture/color has changed, I wouldn't be surprised if it had also  stretched out strangely.


For my replacement fabric, I choose this 59" Anti-pill plush fleece (100% polyester) in Biscay Bay from Jo-ann, that I bought in 2017 after I was drawn to this amazing Mediterranean blue color*. I stitched it together with a matching thread, Gutermann 100% natural cotton thread in Dark Turquoise #7540.


Of course,  the fit turned out just like the original. However,  instead of the basic topstitching I used a zig-zag stitch at the neckline and on the hems for a fun touch.

Another difference is it didn't have that ribbon treatment at the back neckline (see L.L. Bean label pic) because I didn't have the patience to figure it out. Perhaps, on the next one? Anyone know of a tutorial on how to do that? Update: I just found out how to do it in the instructions for the FREE Stellan Tee by French Navy patterns.


Oh, and this particular anti-pill plush fleece feels amazing and has a great weight to it. I recommend it.

* That was long before I chose that same color for one of my winter coats and then ordered two stretch crepes (one pattern, one solid) in that same shade!

Thursday, November 20, 2014

Got The Blues Work Shirt - Built By Wendy (Sew U)


Pattern: Built By Wendy button-down shirt from the Sew U book (2006)

Pattern Description: Slightly-fitted, button-front shirt with separate collar stand, sleeve placket, and buttoned cuffs. Pattern options include yoke, collar, front facing, and pocket customizations.

Pattern Sizing: XS-Large. According to the book's size chart I should make a Large (size 10-12 ). I ended up cutting a Medium from the shoulders to the waist and then tapering out to the Large for my hips.


Did it look like the photo/drawing on the pattern envelope once you were done sewing it? Surprisingly, yes, since I refashioned the shirt from an existing RTW man's shirt.

Approximately what my shirt originally looked like
Were the instructions easy to follow? As I was working from a completed shirt, I can't say that I used many of the book's instructions on this version. However, the instructions read clear to me.

What did you particularly like or dislike about the pattern? It was a more simplified version of the button-down, this version eliminated the back yoke detail. The pattern also included shaping for a feminine shape. However, the best thing about this shirt pattern and instructions were the many ways the shirt could be customized.

This is the true color*.
Fabric Used: A thrifted man's shirt in a wrinkle-resistant! cotton poplin ($5), thread, and Pellon Easy-Knit (AK130) fusible knit interfacing.

The "After"
Pattern Alterations or any design changes you made?: First thing first, I had to cut the shirt down to my proportions using the Sew U pattern. That involved my trusty seam ripper and I took apart the side seams, removed the cuffs and took apart the flat-felled sleeve seams. I then cut out the shirt fronts aligning the pattern hem with the existing finished shirt hem. The original shirt came complete with a self-lined yoke and back pleat. The shirt was so much larger that these were not touched in the pattern cutting and were both removed.

In fact, I cut the new band from the discarded yoke and cut the new collar from the original shirt's collar. I reused the original collar's interfacing and retained the finished top edge.


I cut the new sleeves from the originals lining up the pattern edge with the original sleeve hem edge; therefore, retaining the finished sleeve plackets .


I adjusted the new sleeve width by adding a tuck so that the sleeve could slip inside the original sleeve cuffs. I then added a new line of topstitching to secure them there.


When attaching my band collar I realized the length was a bit off so I created a small tuck on the back neck. This kind of tuck is usually used beneath a yoke but was my only option since the band matched the length needed for the collar.


Update: After trying this on I didn't like the way the area puffed up under the collar. I removed the stitching from that collar section and instead created a faux center back seam by taking 1/2" out of the back width tapering down to 1/4" at the hem.


Would you sew it again? Would you recommend it to others? Yes, after I adapt the center back pattern piece for less width and extend the side darts a bit more for shaping. I was pleasantly surprised that no easing was needed when inserting the sleeves, very impressive drafting.


Conclusion: I love that I was able to refashion this shirt and retain all of the detail of the button plackets and topstitching detail. The shirt was quick and easy to make because of this but the fit is due to the Sew U pattern and I will make more of these, even from scratch!

* Unfortunately, most of my pictures were over exposed and none captured the true color.

Friday, February 28, 2014

Take a Twirl Skirt - Vogue 2747

Pattern: Vogue 2747 c. 1991

Pattern Description: An above mid-knee flared skirt with lined yokes, side front and side back seams, and back zipper. Skirt length is around 20-22". Design by DKNY.*

Pattern Sizing: Sizes 14-16-18. I made a size 16.

Did it look like the photo/drawing on the pattern envelope once you were done sewing it? Yes

Were the instructions easy to follow? Yes, very much.

What did you particularly like or dislike about the pattern? I love that it is a lovely flared skirt in a substantial weight and perfect for black boots or heeled oxfords. The corset-like shape of the waist yoke is a great detail.

Fabric Used: 1 -5/8 yards of red brushed twill (former Nautica buttoned tab curtains from Target), 12" (cut down to 9") red zipper from stash, Pellon Shape-Flex (SF-101) woven fusible interfacing, stash fabric for lining, hooks and eyes.

Before Construction: First thing, first, I cut and ripped the drapery panels to make sure the fabric was on grain. I did this on all four sides. I decided to keep the tabs in case I might want to have belt loops on the final skirt. I removed all the buttons from the tops of the panels, 32 in all (16 marbleized one with Nautica written on the "right" side but unmarked on the reverse and 16 clear backing ones for stability) Because these drapes had been up in my apartment for years, months at a time, there was a lot of visible sun fading on the sides facing out. Before I cut the pieces, I had to make sure that the front of the panels used were not affected.

Pattern Alterations or any design changes you made? I was going to cut the skirt longer, but after measuring the skirts in my closet, I realized the 21" finished length should be perfect.

The inside yoke before attaching the lining.

After stitching together the seven pieces for the waist yoke and attaching them to the skirt I was able to wrap the project around my waist. No final garment measurements were provided for this skirt, so there was no knowing how much ease was included. To adjust the width, I decided to cut 1/4" from the back seam allowances, effectively eliminating 1/2" from the skirt circumference before sewing in the zipper.

I fused the woven interfacing to the skirt yoke pieces. This was the first time I've used this type and I really like it, if gives a nice stiffness to the fabric and it fused extremely easily and adhered well.

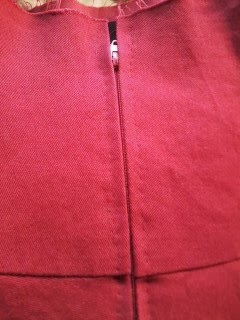
Nearly invisible, right?
After basting on the zipper by hand I decided I liked the minimal look and used a tiny prickstitch, so this is as close as I get to an invisible zipper. Pretty good, right?

It was time to attach the lining. For this skirt, only the yoke is lined so I attached the yoke lining pieces at the top and then folding the edges under I slipstitched the lining over the waist seam and to the zipper tape.


Finishing the skirt; at least for all my skirts, means a hand stitched hem. I prefer handsewing to an obvious stitched line around a skirt. A great tip that I can offer is to use your sewing machine as a hem guide. For a 1-1/2" hem, sew a basting stitch around the hem at the 1/2" mark, this will be the first fold. The stitching gives you the perfect "straight" edge and does half the job for you. Now, you can use a combination of finger pressure on the fold line and steam from an iron to press the fold and shrink out the excess fullness. I find it more enjoyable than using a ruler, a hot iron, and vulnerable fingers to slowly press around a huge circle, measuring all along the way. This way, I just remove the basting threads afterwards. Easy peasy.

Excuse the extra line, which I just ignored.


Would you sew it again? Would you recommend it to others? Yes, I would. This was meant as a quick project with minimal fitting needed and that's what it turned out to be.

Modern knit skirt from Zara with a similar shape.


Conclusion: I love it, a nice swingy red skirt. Funny thing is that I now own four solid red pieces in very similar shades, but different enough that none can be worn together.

*This pattern was secured free during the VA/DC/MD blogger swap!

Thursday, September 06, 2012

6. Summer Tank Top - Grainline Tiny Pocket Tank #31001


Pattern: Grainline Tiny Pocket Tank #31001

Pattern Description: (0-18) Tank top with bust darts, bias bound edges, and a slightly relaxed fit.

Pattern Sizing: Neck, shoulders to underarm in size 8, the rest in size 10.
Did it look like the photo/drawing on the pattern envelope once you were done sewing it? Yes

Were the instructions easy to follow? Yes, very much.

What did you particularly like or dislike about the pattern? I like how the tank is fitted at the top but flows along the rest of the torso. It does not use a lot of fabric or take up a lot of time to sew. I loved the bias-bound neckline as it gave a RTW look.


Fabric Used: A somewhat shiny, lightweight, horizontal striped gray fabric with a foulard pattern perfect for a man's tie. The fabric is a recycle of a dress that Slapdash Sewist wasn't happy with, in fact, she called it her "Prison Matron Dress".

Pattern Alterations or any design changes you made?: I originally was going to use the dress as a dress, slim it down or make a tunic out of it. However, I had the Grainline pattern raring to go and I had made a promise not to buy any more garment fabric, so...  A great recycling project at hand, I laid out the pattern on the dress and it was going to work! The only difference would be that there was a back seam.

The first thing I did before I cut any pieces was to make sure the fabric was on grain. It was not, so I used the pull-a-strand method and luckily still had enough width to cut the front with no piecing. However, because of the grain being off I  could not use the existing back seam. I recut the back on the grain and sewed a 1/4" seam allowance, folded it to one side and made a flat fell seam. In addition, since this fabric seemed to unravel at a glance I encased the shoulder and sides in French seams. I finished it by following the instructions for the tiny 1/4" hem.


This is the true color


Would you sew it again? Would you recommend it to others? Yes, I will make this again, as a top and also as a dress. I also love how Grainline patterns are nested so that you don't have to sacrifice the smaller sizes when it is cut out.


Conclusion: This is a great versatile tank for summer.

Images: my own photos, GrainlineStudio.com