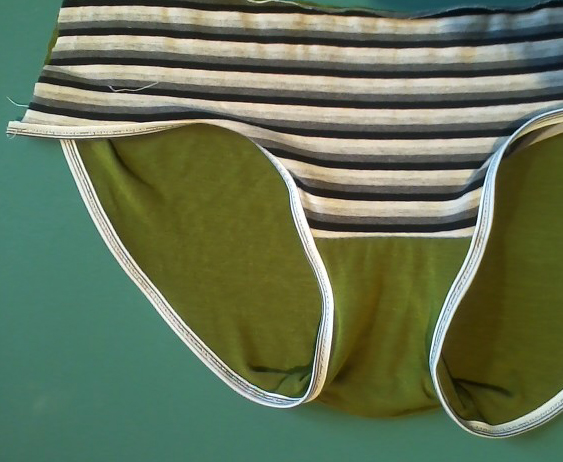
Pattern Description: Bikini-style underwear with side seams, a double-layer crotch gusset, and elastic waist and leg-openings.
Pattern Sizing: (XS-S-M-L) I made the large size.
Did it look like the photo/drawing on the pattern envelope once you were done sewing it? Yes.
Were the instructions easy to follow? Yes, especially because the site provided online tutorials for the construction and alternative finishing options.
What did you particularly like or dislike about the pattern?Besides the pattern being free? Well, I liked that this was the only tutorial I found that resulted in a lining/gusset that had completely enclosed seams. It results in a more professional finish. Other tutorials left one side open.
Attaching the fold-over elastic.
Fabric Used: Jersey/Lycra knit scraps, an old t-shirt, 3/8" wide Dritz elastic, and fold-over elastic* ($.89 per yard) from G Street Fabrics.
Pattern Alterations or any design changes you made: I altered the back pattern piece to account for my coverage needs. I'm not a fan of boy shorts or "cheekies" so this change was necessary for me. Otherwise, I followed the given instructions and attached the fold-over elastic to the legs. I would have used it for the waist but I didn't like the way the elastic behaved, twisting the leg holes every-which-way.
I instead used 3/8" wide elastic. I joined the ends to form a circle, marked it in quarters, and pinned to the waistline at four equidistant points. Using a small narrow zig zag, I stitched the elastic first to the right side (stretching it between pins to fit the fabric), then flipped it over to the back, and stitched two parallel rows of zig-zags. Easy-peasy.
Would you sew it again? Would you recommend it to others? Yes and yes, the instructions were excellent. I have some too-small St. Louis, MO and Guinness Dublin souvenir t-shirts all ready to be the next pairs.
Lauren Dahl's tutorial specifically deals with using fold-over elastic for both the waist and legs.
This very informative tutorial from Sarah Seitz is picture-filled for visual learners.
Conclusion: With this pattern I can now make my own underwear in colors and prints that I can't find in stores. It's also a great way to use up jersey scraps already in my stash and leftover from the knit tops I plan on making in the future.
*Here are some sources for colorful fold-over elastic, Sew Sassy and The Fabric Fairy. I personally found the prices at Joann and Hancocks too expensive.
Gap fuchsia raincoat - This one is still cute (especially with dresses), however without a hood I tend to grab my hooded L.L. Bean rain slicker instead.
Eddie Bauer quilted jacket - I had wanted the red one I saw in the catalog, but when the jacket went on sale in the store all they had was the black. Back then I wasn't so anti-black clothing so I went ahead and bought it.
L.L. BeanWeather System jacket - Bought at least five years ago, this was such a great deal. I have no idea why they don't still sell this or something similar anymore. It was a quilted black Primaloft-filled jacket with a red zip-on rain slicker with a detachable hood. Both jackets could convert to fit into their own attached carrying pouches.
In Winter:
Two bargain wool coats, one gray double-breasted and one classic black with a covered button placket that looks great (and expensive) with dresses.
Various scarves, gloves, mittens, Polartec 180s ear warmers (the best!), and some barely-worn purchased and handmade hats.
Underwear
I am not piling my underwear so do not ask.
However, I will talk about something related. Don’t you wish that you knew immediately when you found something that you will want to have it in your life forever? Like the perfect bra, pair of shoes, or jeans? Then you would have been able to stock up on it without feeling guilty about the money. I wish I had known that when I bought some simple tank tops from Urban Outfitters, a stretchy camisole from Banana Republic, and a few bras from Victoria's Secret. I have never been able to find suitable replacements for these.
The Banana Republic underwear line was basic, practical, and cut beautifully. It was not lingerie in my opinion because it did not have a lot of lace or frills. I do know the winning formula for the fit was 94% cotton and 6% Lycra spandex.
The tanks from Urban Outfitters were just simple cotton but had a very flattering neckline. I am keeping one so one day I can copy the squarish scoop neck; however, I can no longer wear it because it lost all of its stretch and gapes now.
Victoria's SecretBodyflex bras were PERFECT. Why? Their underwire was flexible (duh) and not painful in the least. So flexible in fact that you could wring them dry, they dried fast, and could be rolled up in your luggage, making them perfect for travel. A similarly flattering style is this VS Cotton one, available in 20 colors.
I also have a VS full slip from that same period that I love. No scratchy polyester or stiff lace thing for me. This one was stretchy and slinky, exactly what is needed. It even had a shelf bra. I have not seen this style in their catalog, not even their clearance catalogs, for years. (Have you ever noticed how some things in their clearance catalogs are from four or more years ago? Where do they keep all of this stuff?)
They do however have these with just a little lace and they've consistently been available for the last two years. I'm tempted, but first I have to make two slips from this pattern and I have had the fabric for almost a year.
I will continue to keep buying my bras from the Victoria's Secret clearance sales each year. I still don't see a desire for expensive lingerie; attractive and comfortable are my main criteria right now.
Last year, I said I wasn't going to set myself up for stress by making any definite sewing plans. But, we all know, the planning is the best part of it all! So, here's some of what I would like to attempt in the next six months or so. There will be some finishing up of earlier planned projects like that Simplicity 6656 duster coat and my turquoise Moss skirt; however, I now have more primary priorities in place (career & debt) but these things are what I would like to spend my "free" time thinking about.
Starting with a few small things:
Create a black knit turban for bad hair days using this free tutorial. Done!
Stitch up a practical corduroy clutch purse using a free Fabric.com/HotPatterns download. Done!
Make a full skirt made from Vogue 2747 using my now unneeded red poplin apartment curtains. Done!
Attempt Simplicity 5287, a vintage funnel neck dress, in free green double knit.
Projects I want to try:
Last year, I posted an inventory of the handmade wardrobe items that I still wore from my own closet. I still have quite a few RTW items in my wardrobe. Well, I don't believe in getting rid of stuff before it's been throughly used and bordering on threadbare; therefore, I got thinking...how about altering or embellishing all my RTW pieces and reclaiming them in my own style, so that any Me Made Mays or such would have an advantage?
Why not try reverse applique such as that done by Alabama Chanin. I feel like taking apart some of my RTW knit items, restitching them with raw seams, and adding simple stitched embellishments like this. You know...reclaim the handmade from RTW! It's another way to increase the handmade garment/accessory numbers in my wardrobe. Luckily, I've got lots of embroidery floss from my Wee Wonderful doll supply stash and I also have ribbon and inherited button collections from numerous "no longer with us" personages.
Start on my muslin for the Colette Clovers. I took apart these H & M stretch woven pants in order to make a pattern and will compare that with the Clovers to help mitigate any problems using the Colette pattern.
Muslin and create the Built By Wendy Sew U pants. The fact that they were referenced by Sallie as the basis for these jeans is all that I need. If these work, I won't need to go purchase that popular Jalie jeans pattern.
Underwear and more underwear! I also have my eye on this DL01 balconette foam bra by Make Bra. The best thing about it besides having no underwire is that you can cover the cups with woven fabrics which will make it a stash-buster. *Bonus from moving: I discovered many discarded t-shirts that I wouldn't wear again but could use for these.
Oh! and I will also be participating in Stash Diet 2014, since all the projects above will be supplied from my existing stash. I won't be posting specific goals or fabric counts but you are free to check out my stash (with fabric content and amounts, if possible) on Flickr here.
As the old year* ended, I needed to lighten my load, eliminate the clutter (physically and emotionally), and prepare for bringing light and calm into my life. So, I decided to consult Marie Kondo, the author of The Life-Changing Magic of Tidying Up: the Japanese Art of Decluttering and Organizing. I had watched her Netflix show Tidying Up with Marie Kondo earlier last year and felt inspired to go through my clothes. However, I did not follow her tried and true method as written. I gained a bit of space, yes, but there was no real catharsis or clarity.
Recently, I noticed people mentioning a new Netflix show, Get Organized with The Home Edit. I found it more like a commercial for the Container Store. There was no real thought about why they had all this stuff or if you should keep it. Instead, the emphasis was on the cute products to put it all in for visual aesthetics. Watching it, I felt uninspired by some of their storage solutions, especially when they displayed Reese Witherspoon's movie wardrobe and memorabilia. Working in a museum and being familiar with textiles and restoration, their decisions made me nervous. However, it did make me return to Marie Kondo's wisdom and her KonMari method of decluttering.
Confession time, months ago, I picked up her first book at a thrift store but still had not read it. So I originally started this undertaking only knowing the "Cliff Notes" version. The plan was to catch up on my reading as I went along.
According to her book, Marie believes you should move through your belongings in this order: Clothing, Books, Papers, Miscellaneous, and Sentimental objects.
Clothing is first because, in her years of practice, she considers it the easiest one. Obviously, she has not worked with many Makers!
Clothing
Initial Observations:
Some of the items in my closet are clothing that my mother or I made DECADES ago!
1. They were made for a high school-size Lisa and will never fit again.
2. They are no longer my style or in the colors that I wear. I mean, there was an iridescent pink ball gown skirt in there!
3. They were items that I was incredibly proud of and wanted to remember.
When I first started sewing clothes in the 1980s, that's how I spent most of my free time. I was fascinated by clothing construction and frequently attempted ambitious projects such as Issey Miyake and Karl Lagerfeld Vogue designer patterns, lined garments, bound buttonholes, the pad-stitching of a tailored jacket, and working with sheer and silky fabrics. Back then, I didn't know to be scared of doing those things; I was FEARLESS!
For sentimental reasons, those items avoided "the purge" time after time. I would move them from one home to another, and they continued to take up space.
A great point Marie makes in the book that doesn't stand out enough in the media is this:
It's NOT about throwing things out; continually throwing things away to eliminate "clutter" is not calming, and it will never bring happiness. The goal is choosing what you wantto keep in your life(the Does it Spark Joy? concept). It's a way to take a closer look at what you surround yourself with and how it makes you feel.
My personal experience was that I loved most of my clothes, but why wouldn't I? I made them! As a maker/sewist, I could say that about my clothes because they were unique to my tastes and style.
However, I could eliminate some:
Things that were several sizes too small, items stretched beyond repair, pilled knits, and others that I no longer felt good wearing. These would be easy to discard.
The "slightly ill-fitting item but after losing a few pounds I could fit again" items. Who needs that pressure?
Those that may still spark joy, but because of the style, I would not wear them.
Things that my late mother made for me over 30 years ago.
Things that I planned to alter or adapt that I still hadn't done.
The other goal was to remove these from my home in a way that I felt good about, either by donation of the good RTW stuff or fabric recycling because clothing donation sites don't take kindly to handmade items. (There is no easy way for them to label sizes on these, so I get it.)
There was a small fear that if I got rid of everything that doesn't spark joy, would I have any clothes left? The answer was yes, the ones that matter.
Here is everything in this category that left my wardrobe.
Final Observations
Outerwear: I gave away five jackets/coats which could not close over my hips. I kept the four that fit; three I bought recently and my handmade Issey Miyake-designed coat.
Tops: I found out my wardrobe is 70% tops. I am severely lacking in coordinating skirts and pants.
Pants/jeans: I found a well-fitting pair of jeans recently bought (during Covid) that I had lost track of in my closet! I now have four wearable pairs of jeans and two pairs of knit pants.
Scarves: I had several but never wore them. ALL GONE.
Underwear: Two sad bras are now gone, and I replaced some worn underwear and socks.
Purses: I thought I had maybe 6-7, but I had SIXTEEN bags! How did that happen? I now plan on storing the bags that I kept in a way where I will see them and use them more.
Shoes: There were so many that I no longer wore. I lost five uncomfortable or worn pairs. The others will be stored so that I can see them and wear them more often.
Here's an example of decluttering I found on the Interwebs from Wild We Roam. It isn't the KonMari method, but I felt this experience was very similar to mine.
Prudence Glynn, a fashion journalist, described Coco Chanel’s style as functional chic, which is completely accurate, seeing as her clothes came from the desire to dress herself in comfortable functional pieces without extraneous details. Practicality was the genesis of her style, in the ease of putting on a man’s sweater, the abandonment of the corset, and the light comfortable use of jersey as the fabric of choice.
Silk charmeuse day suit, 1927.
An outsider because of her lower class background, Chanel’s connections and love affairs with men of status and importance allowed her access to wealthy clients and the money to back her retail ventures. Originally a milliner selling hats in a small shop, she soon branched out to clothes.
Tweed day suit, 1963-68.
Her early style consisted of an unstructured cardigan-like jacket in plain jersey and calf-length straight jersey skirts worn with white blouses; otherwise, known as the “dressmaker suit.” Though now known almost exclusively for her eponymous Chanel suit, the popularity of that design did not come until the second half of Mme Chanel’s career when she reopened her business in 1953 after a fifteen-year retirement. Though similar to her earlier suit design, the later style jacket of 1964 consisted of loosely woven tweed or mohair trimmed with braid, gold buttons, and lined in fine silk. The patch pockets used on her jackets caused criticism because they were thought ungainly and unladylike and their placement at the hips altered the posture of the women who wore them. However, her dresses were still feminine and skimmed the body, no bouffant or crinoline looks from her.
Gloria Swanson
Hollywood connection:
In 1931, she was employed by Goldwyn Mayer Studios. For one million
dollars she was contracted to travel to Hollywood twice a year. She
created the costumes for Palmy Days (Jean Harlow), Tonight or Never (Gloria Swanson), both disasters in 1931 and The Greeks Had a Word for It
(Joan Blondell) a success in 1932, before she quit disillusioned with
what the studios wanted from her – a style that was not her own.
Wool rayon lace gown, 1938.
Home sewing connection: In the 1950s, Elle magazine published a House of Chanel pattern offer in their magazine and received over 25,000 requests!
Tweed coat and day dress, 1929.
Silk evening dress, 1930.
Her style, innovations, and influence on fashion:
Her favorite colors; navy blue, beige, black and white coincided with the WWI restriction on colors used for clothing.
In 1921, she launched Chanel No. 5 in direct contrast to Paul Poiret’s earlier and more fanciful fragrances, both in presentation and in formulation. No. 5 was the first to combine natural and synthetic components to insure a long lasting scent.
Along with her suit, other iconic Chanel details were the combination of beige and black, black-toed, beige sling-back pumps, quilted handbags, silk Camellia flower brooches, strings of pearls (real and fake), straw boater hats, and gold linked chains.
Jersey fabric; formerly only used for underwear, and tweed were considered cheap and mainly working class fabrics. However, her use of lightly quilted silk linings and her superb tailoring made them chic.
Sources: Chanel, (2005) Harold Koda; Dressmakers of France, (1956) Mary Brooks Pickens, Dora Loues Miller; Secrets of the Couturiers, (1984) Frances Kennett; Fashion(2003) Christopher Breward; Costume and Fashion: A Concise History, (2002) James Laver.
When it comes to the printed and packaged patterns (like the Big 4) I have a good idea of what I own because of my pattern inventory on Flickr. However, my PDF patterns are all over the place; saved digitally on one desktop computer, some are on a portable disk drive (I think they have the same ones?) and others have already been printed out and been placed in plastic sleeves for storage and easy access.
However, what exactly are they? Where did I get them, how much did they cost, and how many are dresses, tops, lingerie, etc? I spent some time looking through my computers and compiled a list of all the downloaded patterns that I've accumulated. I am thoroughly shocked at how many there were especially since I already have more than one hundred "old-school" packaged patterns from the Big Four and a few independents. I really shouldn't NEED any more patterns, right? Hmmm...
Well, here they are below. I included links to the companies/designers just in case you want a bit of this good stuff too. I also have a Pinterest group devoted to free patterns and tutorials here. Yes, I am enabling your hoarding habits...and you are welcome. PURCHASED PATTERNS
Grainline Studio
Scout Woven Tee 31002 *
Moss Mini Skirt 32001 *
Tiny Pocket Tee 31001 *
Maritime Shorts 35001
Hemlock Tee *
Paprika Patterns (free to me as a tester)
Jade Skirt *
Jasper dress/sweater
Sew Loft Patterns fkaSpitUp&Stilettos
Company is no longer in business but their entire pattern archive is being hosted by Hoopes Park Studios on Dropbox for FREE!
Gabrielle Blazer
Emma Pant
Matilda Legging
Karina Skirt
I am totally crazy about all the cool colors that it comes in, I guess in part because a lot of children's clothing is made from it.
If I could, most of my winter wardrobe would be corduroy pants, jackets, and flannel-lined corduroy jumper dresses. The corduroy itself would come in both thin and wide wales, along with some no-wale cord, which closely resembles velvet. I love how corduroy is so warm in the winter, taking on your body heat, whereas jeans are cold to the touch immediately upon walking outside. In addition, corduroy feels so comfy and homey with its nubby, panelled texture.
I would, of course, then supplement my wardrobe with a few pants and dresses in velvet & wool, some dresses and shirts in flannel, and then some felted sweaters worn atop silk long-underwear tees.
red, brown
green, orange, yellow
purple & pumpkin
However, I would wear almost all of these colors and I plan to try.
Oh, and checkout this vintage gem I found when I searched for corduroy dresses...
This entry is for all the makers working in garment sewing, crafting, and home DIY projects. How do WE declutter?
This particular category was not given significant focus by Ms. Kondo. Supposedly it is a part of the Komono/Miscellaneous group. I didn't even realize that fact until I had my latest stack of plastic bins in front of me. These five small bins were just my crafting supplies, but I realized I also had my heavy-duty DIY tools, plus loads of garment fabric and sewing patterns. Luckily, I had done the first pass on those last two categories pre-KonMari, and I did not revisit those now. Note: When I decluttered that time, my only criteria was 'could use the fabric in the future?' I am now aware I will need to go through them again with "Do they spark joy?" in mind.
One of the difficulties with this category and the KonMari method is the whole concept of "sparking joy." When you work with craft and sewing supplies, you want some surplus materials or a "stash." These items will come in handy at some point but do they necessarily spark joy?
DIY SUPPLIES
I had multiple cardboard boxes and plastic containers that held all of this stuff. I needed to organize, consolidate, and label everything that I had. I ended up with four specific containers:
Paint Prep: A small portable tub with my pre-painting gear such as nitrile gloves, assorted paintbrushes, foam brushes, sanding blocks, latex caulk, spackle, Frog tape, some blue painter's tape, a paint can opener, plastic drop cloths, and a concentrated degreaser and cleaner for prepping all surfaces before painting.
Primary Paint: Aplastic tub holds the plastic paint trays the I line with aluminum foil, my handy paint pail (if you use latex paint, you can let it dry out and later lift the entire pail shaped paint thing out, it's so freaky cool!), extra foam rollers (in two sizes), paint edging tool, plastic cups, and painter tripods to support drying objects, small portions of leftover paint, Kilz 2 primer, and my must-have supply of Minwax Polycrylic in Satin.
Electric Tools: Another container holds my products which just happen to be Black + Decker products; a BullsEye auto-leveling laser level with stud sensor (BDL190S), 7.2-volt cordless screwdriver (PD600), and a 1.2 Amp corded Mouse detail sander (BDEMS600). Because there was room leftover, it also holds the tile leftover from the kitchen makeover (Yup, I know, potential future clutter!)
Manual Tools: These live in a plastic toolbox with multiple-sized screwdrivers, wire cutters, two box cutters, two types of old school levels, a complete set of sanding files, two sets of pliers, and .
SEWING NOTIONS
IKEA Misi table (No longer available)
I have an old IKEA Misi table with four convenient drawers that I use to store my most used notions.
This drawer holds all of my old Coats & Clark's threads. I now have a separate container for the Gutermann thread that I use now.
Sewing and machine needles, sewing scissors, my rotary cutter, walking foot, seam pickers, and my marking chalk all live in this drawer.
This one holds my sewing labels, pinking shears, fabric swatches,
My Babyloc sewing machine manual, tracing paper, tracing wheel, tape measure, my bobbin thread box, and the-all important not-for-fabric scissors live in the last drawer.
In addition, my sewing cabinet (a former Spiegel Catalog armoire) holds even more. Inside, it has several similar-sized plastic totes, each with a different purpose.
Notions: One container holds all my interfacings, Pellon Easy Pattern paper, seam bindings, elastics, ribbons, velcro fasteners. To simplify things, they are all in individual clear plastic zip bags, so I can easily see what I have.
Knit Scraps: This one holds all the good knit remnants, fold-over elastics, and salvaged findings that could be made into underwear, tank tops, or turban headbands.
Office: A little bit different, this tote holds tape, rubberbands, envelopes, pens, plastic sheet protectors for my PDF patterns, and archival envelopes I use to protect my vintage patterns.
Soft toys: Leftover fleece, juvenile print fabrics, and felt that I can use to make things for my grandniece and two grandnephews.
Crafts: See below.
Paints: See below.
CRAFT SUPPLIES
For me, craft supplies meant: older unopened acrylic paint tubes, newer acrylic paint for small projects, assorted paint brushes, sandpaper, pipe cleaners, hot glue gun, a staple gun with staples, rulers, several different types of tape, oil pastels, chalks, drawing pencils, stencils, unused origami paper, watercolor paper, sheets of vellum, metal knitting needles, and even a set of circular bamboo knitting needles.
I also had a small jewelry supply stash of jewelry findings, leather and suede cords, beading wire, some leftover elements from older jewelry pieces, plus packages of metal and wooden beads.
I took my time going through these, thinking of the likelihood that I would ever use each one or if it would be more useful to someone else, i.e., could it spark joy in someone else? If so, they were moved to another tub destined for the ScrapRVA reuse organization in Richmond.
An in-progress donation tote
Donations
I love the idea of oil pastels (I bought them for a college course in 2010), but I never used them after that, so it was time for them to go. Once I started thinking about it, more things made their way into the ScrapRVA donation box. So, could I see myself needing and then using it in the foreseeable future? That was the main question I asked myself. The effortless donations were any items that I had in multiples, or I had no idea that I even owned it. I ended up with a healthy group of things; many were never used.
Observations
At one point, I found myself trying to justify keeping items that could still bring me joy. You know, you can always use paint, pencils, hot glue... I had to revisit the contents of a few containers several times to remove things that I knew would continue to sit around unused. Because that was the same attitude that filled those boxes in the first place. Perhaps I was having a more difficult time because I took longer with the KonMari process than I was meant to. Ideally, you do it in one continuous session, not over several months as I did.
For now, the box of donations, my box of 100+ sewing patterns, and any other goods for ScrapRVA are living in my car's trunk until I drive to Richmond to hand them over. That's good enough for me.
Throughout my years reading blogs; from 2006 to now, I've followed a lot of long-term wearable art projects - from Little Brown Dress, FiftyRX3, States of Dress to The Uniform Project. (I so want a version of that dress!) From a mention at Colette Patterns, I was directed to another project I now want to follow...
It's creator, Natalie Purschwitz, has taken on the task of creating every single item of functional clothing that she wears, from underwear, tights, outerwear, shoes, with a few accessories also thrown in the mix. Check out the great big bag below and the rocking "moon" boots that she madehere!
I love her diagonally fastened sweaters and coats; some that criss-cross in the front, and her asymmetrical skirts, especially that draped one with the doubled flap seen below.
It's a very ambitious project, I want half of everything she's made, and those lace-up shoes she created for herself are beyond wonderful! I look forward to seeing her full-on winter wardrobe as I love woolly, sweatery things the most.
Outerwear - love, love, love.
She is now three months in, so there is still plenty of time to get hooked on her daily posts.
Oh and before you ask...she does have a clothing line, Hunt & Gather, where items like this dress (!) are available.
I am tempted to start on my eyelet version of the Scout Tee.
Oh, and before I even started on the dress I had already cut out the bengaline for the Vogue pants! But then the weather got to warm for polyester trousers.
I'm procrastinating on the dress because I have to add a panel of a different fabric to the bottom to make an appropriate length. The A. Henry fabric does not wrinkle easily but the red challis I found for the panel does. I'm also scared about cutting the hem evenly across. I want to double up the challis and use the fold as the bottom of the dress, more like a facing so the base dress really has to be even. Attaching the challis that way will give the challis a bit more body and make it similar to the drape of the cotton print.
So, you can imagine, my living room is a disaster. I need to start ticking off these projects. This weekend is my first in a long time that is two days in a row because I don't work this Sunday. I hope to get some stuff accomplished. Wish me luck.
Sent an email to both McCall's Patterns and Simplicity Patterns offering up some of my vintage patterns as loans for their reissues.
Posted ten more patterns in the Metamorphpursuit shop. Not as easy as it seems: the prep involves photographing or scanning the actual patterns, doing any necessary touch up work on the images, transcribing or copying the pattern descriptions, and researching current prices to come up with a realistic market price. Luckily, for most of my 100 patterns I have the images and the descriptions saved in Flickr.
Did research for my upcoming New Jersey/Philadelphia trip and discovered that they had three different sewing workshop/sewing schools (Butcher's Sew Shop, MADE Studio, and Handcraft Workshop)
Proofread 10 more chapters of my sister's upcoming thriller, Pay To Play, marking with my little red pen.
Sunday:
Removed worn out elastic from a favorite skirt to replace.
Took apart an old pair of underwear to make a pattern.
Removed sleeves from Simplicity 5190 because I never wear it and hopefully this will change that. I still love the fabric and I was going to take it apart and make New Look 6968 but Jo-Ann never brought back the brown stretch gabardine in Potting Soil that I wanted to use for the skirt.
Traced New Look 6216 and redrafted it from a top into a dress. Since the weight gain, I find myself almost obsessive about cutting out patterns and fabric because I'm scared the final make won't fit over my hips. This attitude
is not making me happy. The failure of my New Look 6145 muslin still affects me. Being so out of touch with my own body
is weird after knowing it so well for so many years and I'm sill mourning the image of that small breasted girl who fit all the clothes in her closet.
Looked up info for my dad on his medical insurance and prescriptions.
Digusting, right?
But the BIG thing that happened yesterday was that I discovered my father has been covering the floor in our storage shed with rugs even though the room floods periodically. Who does that? Argggghhh! Once he mentioned that, I ran out to see if any of my stuff (this shed is where the contents of my old and future life lives) had been damaged. I found out that my perfect rug; which had been rolled up in a plastic bag was standing with the unprotected (!) non-plastic covered end on the wet and moldy carpet. Worse yet, my lovely Bruneifabric had been rolled up inside the carpet, again directly touching the moldy carpet. So for the rest of the day I fought to protect two of my favorite belongings.*
Both the rug and 8 yards of the 54" fabric were draped across our wood deck to get dried by the sun. A little research revealed that the rug was 100% nylon so it should be okay after it has dried and been steam cleaned. I now regret I didn't rent the steam cleaner right then but I was very upset and in shock. After the fabric got a few hours fe sun I ran it in the washer on the sanitary setting in HOT water for 1hr 40min with white vinegar, a bit of Shout, and detergent. I then washed it a second time for a regular 40 min cycle and then dried it thoroughly. Afterwards, I ended up discarding about 10 inches of damage from the selvage inward by ripping along the grain.
Hopefully, tomorrow will be just as full of completed tasks but hopefully more positive and fun than that last one!
*that I hadn't been able to store in the house. The others include my rocking chair and my Crosley turntable, which luckily were left unharmed.

.jpg) Were the instructions easy to follow? Yes, especially because the site provided online tutorials for the construction and alternative finishing options.
Were the instructions easy to follow? Yes, especially because the site provided online tutorials for the construction and alternative finishing options.