Showing posts with label familywedding2017. Show all posts

Sunday, June 10, 2018

Wedding Guest Dress Breakdown: One Year Later

Speaking of weddings, my niece got married last year on June 10. That spring, I had written a series of posts on the making of the two dresses I wore, a green silk evening dress and it's multi-color slip. I ended up finishing the main dress a mere two days before traveling to the wedding and didn't get any satisfactory pictures of me in my complete outfit.

So on the one-year anniversary, here's an update on how I wore the dress to that wedding. I pretty much looked at it as if I was going to an awards banquet. I researched and sourced the individual elements from all over. There were plenty of things that I bought and returned, things I lucked out on, and even things I eventually would regret not buying.

I received a hint of what I wanted to wear when I saw a swatch of emerald green silk crepe de chine and it reminded me of my favorite green dress in Atonement. Once I decided that was the way I wanted to go I started thinking of a 1920s-30s vibe. Of course, I didn't take that literally. However, the dress pattern I chose, Vogue 2745, did have the v-neck, elongated waist, and a handkerchief hem reminiscent of 1930s style.

My most important concern was my hair, a short curly natural that was drastically cut too short a week before this event. So how was I going to style it to fit this dress and the romantic vibe I wanted to have? Luckily, my love of award show red carpet reporting came to the rescue as you'll see below.


Moving clockwise:


1. Once I saw this double-tiered Jennifer Behr gold headpiece that Janelle Monáe wore to the 2017 Vanity Fair party I knew what I needed to find. This led to a search of accessory shops such as Claire's; however, I never really expected to find something that came so close, but I did!


2. The winning earrings came from Charming Charlie's. Why did no one tell me about this amazing place, all organized by color? They have everything, purses, scarves, jewelry, even tiaras! These earrings not only picked up the emerald but also royal, turquoise, and chartreuse. They will be worn lovingly for years.


3. An extremely cheap $1(!) compact mirror from Michael's arts and crafts, of all places, in a green that matched my dress perfectly. I also bought two more in pearlized white and royal blue for the bride and her maid-of-honor.


4. Yes, I actually found an extremely similar headband, the gold double row daisies headband shown here from icing.com, although I found mine locally at Claire's.


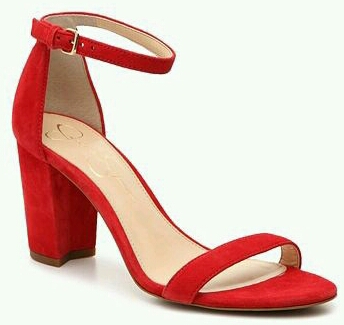
5. The Style & Co Paycee sandal in Red from Macy's. I bought these because they weren't as tall as my first choice, the 3" high Monrae from Jessica Simpson. However, the Paycee non-adjustable ankle strap turned out to be extremely constricting and I had to change shoes in order to dance.

Monrae sandal

I ended up wishing I had gone ahead and bought the taller Jessica Simpson's even though I probably would have taken them off too but at least I would not have had to compromise on style.


6. The Wanda zipper wristlet, an adorable purse in gold from Charming Charlie's. This will surely get a lot of use in the future.

7. L.A. Girl Color Pop nail polish in Amour, a fabulous red that adorned my toes in those perfectly color-matched shoes.

So, I wish I had a picture here to show you all these elements coming together but I didn't actively try to get a picture of me taken in the completed ensemble. Someone did get two pictures of me that day with family and hopefully I can get them color corrected so I can post here.

Monday, October 09, 2017

'Rolling In The Deep' Green Frock - Vogue 2745


Pattern: Vogue 2745 (2003)

Pattern Description: Close-fitting, bias dress has gathered shoulders with lingerie strap guards, side insets, and shaped hemline.

Pattern Sizing: Size (14-16-18) I cut a 14 for the bust moving out to a size 18 for the waist and hips.


Did it look like the photo/drawing on the pattern envelope once you were done sewing with it? Yes, it did!

Were the instructions easy to follow? Yes, the only difficulty was in the insertion of the side panels. If I ever make it again, I will redraft those sharp angles as shallow curves instead.


What did you particularly like or dislike about the pattern? I love the shape of this dress, I love the retro 30s style, the handkerchief hem, and how in the color I chose it evoked "that" green dress worn in Atonement by Keira Knightly.


Fabric Used: 3-1/2 yards Kelly green silk crepe de chine (100% silk) from Mood Fabrics at $22.99 a yard, 100% polyester Gutermann thread in Kelly green #760

Tools Used: Collins .5mm steel silk pins, Schmetz Microtex Sharp needle 70/10, Dritz brass sew-on snaps size 4/0, Pellon 830 Easy Pattern tracing cloth


Fabric preparation: The thing that scared me the most about this project was having to deal with sewing silk for the first time. There were many warnings about how difficult it would be to cut, how easily it could be stained if it became wet, and that it would need to be dry cleaned. After purchasing the fabric I cut a 4" x 6" swatch in two and experimented. I sprinkled water on one and washed the other by hand with a little detergent. The water drops, even when dried, left a ghost-like mark on the fabric. The washed segment, while not as smooth, gained a subtle texture, shrunk very little, and kept its sheen and glow. It could now be handwashed because my personal history proves that I do not dry clean.

Next step was trying out tools and techniques on scraps of silk. I purchased silk pins and a fine 70/10 machine needle specifically for this project. Again, everything worked well. I did not need my walking foot because the fabric did not slide around under the needle. In addition, the pins did not leave any holes.

I pre-treated the silk by submerging it in warm water mixed with a tiny drop of detergent and applied some gentle agitation. I finished by putting it in the dryer on low heat for only ten minutes in order to remove some of the water weight before letting it dry completely over my shower rod.

After the fabric was dried, but before I cut into it I wanted to make sure it was on grain and had not been stretched out by my method of drying. I pulled a thread on the crossgrain at each cut end and ensured a straight grain for this glorious silk and the best outcome for a bias gown.


I heard so much about how slippery silk could be to cut that other sewists cut it out between sheets of paper to keep it from moving around. Luckily, this crepe de chine gave me no worries, perhaps because of it's new texture or the subtle texture from my cutting mat. I used my rotary cutter (with a fresh new blade) and since my Olfa mat is small and could only work under a 18" x 24" section at a time, I sacrificed my $12 cardboard cutting board to the blade in order to cut all twelve pieces without moving the fabric around unnecessarily. It worked fine with minimal damage and I still haven't needed to replace the board.

Easy Pattern tracings of bodice pieces.

Pattern alterations or any design changes you made: Just like with the slip, I traced the bodice pattern pieces with Pellon Easy Pattern so that the originals could stay intact. It's very durable and I like that it is a heavier weight and not as slippery as the paper pattern pieces because they didn't move at all when I was cutting this potentially slippery fabric. This is great stuff and I highly recommend the product.


See ripply neckline with tiny hems.

I made a muslin of the bodice in the same fabric as the slip muslin, which was an annoyingly slippery polyester. I attempted to form the tiny hems on the front and back necklines and on the armscyes. NOT pretty.

Vogue designed a single layer bodice, preferably made in a lace or sheer fabric, with rolled hems on all the edges and I did not have the confidence to believe I'd be happy with the outcome. There was too much potential for error, even if the first section turned out great there were seven other opportunities for disaster. Since using an opaque fabric I wouldn't have the issue of visible seams so I decided to line the bodice with self-fabric which would encase all the bodice seams.


Therefore, when it came to cutting out the pattern I cut the four (now eight) bodice pieces in size 16 for the shoulders, neckline, and length but cut the sides in size 14. This was my untested way to address my C-cup self in a B-cup drafted pattern. (However, this didn't work the way I expected and I wouldn't do it that way if I ever make this again.) I cut the main skirt pieces at size 14 at the waist moving out to size 18 near the inset insertion points while the inset pattern piece was cut in a straight size 18.


Construction:


I used thread tacks to make all of my pattern marks using my smallest and most delicate sewing needle. When it came to the darts, I folded them into place and thread traced the stitching line for stabilization. It worked well and became the process for all my future seams.


My construction of the bodice is, of course, different from the pattern. Besides cutting double the pieces to line the bodice, I also attached each front and back at the shoulders placing a strip of the fabric selvage in the seam for reinforcement.


Some reviews complained that the darts were pointy and I agree. I tried to alter the dart point in my stitching but I didn't have that much control with the silk. Since I had four finished darts in all, I was lucky that I could pick and choose the two least pointy ones to pair together for the outside layer of the bodice.


Per the instructions, for each seam I stitched a second line 1/4" away and trimmed close to that line. For each bodice pair, I alternated the seam allowance to reduce bulk at the shoulder; pressing them forward on the outer layers and to the back for the lining.


I paired a front and back outer layer with the corresponding lining and pinned then together within the seam allowance. Once sewn together, I pressed the seams flat using a press cloth each time. Like with all the other seams in this project I stitched another line 1/4" away and trimmed away the excess.


Then came the fun part of pulling the pieces through the shoulders. The pressing flat of these pieces took almost two hours(!) as I used my fingers to set down the edges precisely and then pressed them, tiny area by tiny area, using the press cloth. It's important to get a truly crisp edge as you go along for a well done finish.


I opened up the sides to sew the side seams, from the lining to the outer layer, so to leave no visible unfinished edges on the inside. After basting the bottom edge of each piece, I set them aside to work on the skirt pieces.

First thing first, I stay-stitched the top of the main skirt pieces and reinforced each inset insertion point. My lined bodice was now heavier than the pattern had planned so I thought about adding selvage strips at the waist and at the insertions for added structure but couldn't figure out how to not have those visible on the finished dress.


The side seams were sewn together, trimmed, and pressed towards the skirt back. I pinned the insets into the main skirt and basted the entire seam first, anticipating the coming difficulty of sewing them in (and the importance of getting it accurate in the silk in the one and ONLY try) This was very time consuming. I had no problems sewing the seams, I mean there were slight bubbles at each inset but it wasn't as noticeable after the dress hung for 24 hours and even less when worn on the body. I pressed and trimmed those seams as instructed.

This is the accurate color but the detail is clearer below.


It was now time to decide what to do about that 107" hem! I remembered that I owned a narrow hemmer foot bought maybe a decade earlier. However, after watching a tutorial and practicing some I was not convinced that I could use it successfully. I decided to refer to Jen Beeman at Grainline Studio for an easy rolled hem tutorial and just took it very slow and deliberate in order to not stretch the fabric and create a rippled edge.

Finishing steps:

One of my last things to do was tacking the v-neckline so that it laid flat on my chest. After trying the dress on I noticed that the bust darts were a little low so I had to take up the shoulders 1/2" for optimal placement (something I may have done to myself by trying that makeshift FBA.) I gathered them per the instructions but am not happy with the look. Because of my unique constitution I couldn't open up the seam and correct it the usual way so it was a bit sloppy. If I had more time I would have created separate fabric loops or bands to cover the gathering stitches.


I have to admit as the countdown to the wedding sped up I did not spend enough time practicing the thread chain for the lingerie strap holders so it was not as neat as it could have been but they worked and were hidden. I consider that as mischief managed.

Would have been SO easy!

Next time, I will probably go to the trouble and make my own with matching ribbon or use the store bought ones, like above.

See how well the lingerie straps were managed!

Would you sew it again? Would you recommend it to others? Yes, but I would alter the pattern in the following ways:
  • Shorten the bodice by 1/2" between shoulder and underarm and take in the bodice by 1/2" at the sides OR cut a straight size 14 bodice from the beginning!
  • Exaggerate the scarf-like curves of the hem even more.
  • Create some interest in the middle of the neckline, perhaps with a brooch or a fabric rose.
  • Construct a matching thin buckled belt or a silk ribbon tie.
  • Create some type of shoulder drape or neck tie for added interest.


These are not the shoes I wore.

Conclusion:

Testing the China silk over the slip/dress.

I had so many ridiculous doubts before buying the fabric for this dress (all having to do with money!) when I should have bought it months ago! However, the closer I got to the wedding travel date, the more research I did to justify whatever reason I chose. There was a point where I checked to see what other fabrics Mood had in that same Kelly green, hoping that one of the fabrics would be just as wonderful but cheaper, such wishful thinking! I found their polyester charmeuse for $6.99 and their China silk for $13.99. The China silk (seen above) was exactly the same shade but far too sheer and my sewing machine did not like it at all. After realizing I wouldn't be satisfied making my dress with any other fabric than the one that inspired it (DUH!) I bit the bullet and clicked that order button!

Some reviews that did convince me were Aga Hagstrom's incredibly detailed and documented pattern review entry for her wedding dress using Vogue 2745 and Lladybird Lauren's luscious blue silk crepe de chine Anna dress which convinced me that this WAS the right fabric for the job.

Information on sewing with silk:

2. Sewing with Silk - Sew 4 Home
3. More Tips and tricks-sewing with silk - Craft Stylish
1. Differences between types of silk fabrics - My Textile Notes
5. Clean finish a lined sleeveless top tutorial - The Slapdash Sewist
6. How to fully line a bodice - Kitschy Coo
4. Easy rolled hems on silk - Grainline Studio

Project Links:
Surprise! Actually Buying Fabric With a Purpose!
A Change To The Wedding Guest Dress
Wedding Guest Dress - Finalizing Details
'Song To The Siren' Slip - Vogue 2745

* Rolling in the DeepAdele, 2011.

Friday, September 01, 2017

DIY Wedding Card Box Part 2 - Embellishments

Yes, in the form of a very long post, it's time for the fun part!

Time to discuss the details that made this card box stand out and grab attention. At this point, the boxes had been covered in fabric and were ready for the next steps but first, here is a bit of background on how I made the decision about exactly what fabrics to use and how they would be arranged.

BME Event Group: Dana & Sean 6-10-17 &emdash;


I knew I would be using the colors gray, cobalt/royal blue, ivory, and silver, to represent the groom and groomsmen in light gray suits, bridesmaids in blue dresses, the bride's dress, and her rhinestone sash/belt, seen above.


I bought some appropriate swatches from Jo-Ann; two stretch satins, a stretchy metallic performance fabric, and a fabulous patterned brocade that combined cobalt, navy, silver, and white. I desperately wanted to feature that last fabric, unfortunately, the bride wasn't as into the brocade as I was. As you can see in my mock-ups below, I had originally thought of using it to cover an entire tier...well, that was vetoed. I thought it was the perfect addition to cohesively tie the colors together. Eventually, I found a way to incorporate it into the overall design.

I had spent time with the swatches playing around altering fabric position, amount of color coverage, and proportions. Now the practice box used to trial my fabric covering shenanigans was put to use to preview different types of surface decoration.


For your information, here again is the list of all items and tools I used in my card box project. This post focuses on the decorative items.

Materials:
  • Darice 2849-06 Paper-Mache Square Box Set, 8/9/10" 3-pack from Amazon $12.49
  • Darice paper-mache square box, 4" x 4" $1.50
  • AMAZLINEN sequin table runner, 14" x 108" in silver $11.99
  • 1 yard Casa Collection stretch satin in White $10.49,
  • 1 yard Casa Collection stretch satin in Dazzling Blue $10.49,
  • 1/4 yard Brocade floral stripe in Royal/Navy $1.75,
  • 1/3 yard Mystique performance fabric in White/Silver, all from Jo-Ann Fabrics $6.37
  • Celebrate It 360 5/8" satin ribbon in Royal $3.99
  • Recollections 5/8" white ribbon with white polka dots $1.00
  • Offray 7/8" wire-edged ribbon in Royal $5.99
  • Two Bead Landing Sticky Gems Value Packs in clear crystal rhinestone $4.99 (2)
  • Dovecraft Essentials crystal self-adhesive letter Q $1.00
  • Offray 5-petal violet ribbon flower with pearl in Royal $1.99
  • Elmer's Multi-Purpose Spray Adhesive $6.99
  • Elmer's Washable School Glue Stick $.95
  • Aleene's Original Tacky Glue $.69
  • Olfa 45mm rotary cutter
  • Emery board (or sandpaper, of course)

Total: $87.66

First lesson learned


I bought the wired ribbon first because it was the only one in stock that matched my satin fabric, the other ones were definitely royal, which is a brighter and more primary shade of blue than cobalt. The wired ribbon was horrible for this task because it would not lay flat against the box and the Aleene's glue soaked through and could be seen, even after it had dried. Luckily, this was all on the practice box, so for the real thing I bought a glue stick instead.


Note: Though we decided to try for a simple and more classic design, there were definitely a lot of amazing trims out there that could have been used. I found semi-sheer glitter covered ribbon, wide ribbed grosgrain, and ribbons covered with glitter dots, or made of metallic silver. In addition, there was this 4" stretch sequin paillette trim and many varieties of rhinestone-type- trims.

Bling


Now it was time to bring in the bling! I ended up loving these self adhesive gems, they were so easy to cut apart and position. This was the least stressful step of all. I used my rotary cutter (again with an old blade that I no longer used on garment fabric) to cut apart the rows and also to make neat the ends. I applied it along the bottom edge of all the boxes by first wrapping a complete strip around the corners and filling in the resulting gaps with pieces, making sure to line them up so it appeared seamless.


My favorite part is the very top, I saw that detail on another box and knew I had to do that here. It took the thankless card entry and elevated it to a design feature.

Ribbon

After Michael's restocked, I was rewarded with some non-wired "royal" blue ribbon and a novelty mini-roll of white satin ribbon to use on the bottom blue box. I wasn't thrilled that the white had white polka dots painted on it but it was only a dollar and the other whites didn't match my white satin. I still was unable to find either colors in a wider width (3" would have been ideal) at the time but vowed to make it work.


Next step was applying a row of satin ribbon right above the rows of gems. I first wrapped the ribbon around a box to get the correct length and then pressed under about a half inch at one end. I started each strip at the back seam, overlapping the pressed end over the cut edge. I also made sure that this was the same corner that the fabric closures were so that those sides would face the wall of the venue, leaving the pretty sides out.

This time, attaching the ribbon was SO easy! Since I was using a glue stick that would dry clear and was the same width as the ribbon, I ended up applying the glue directly to the satin, being careful not to go outside of that dedicated strip area. That entire bit of decorating took less than an hour.

More Bling

I had been unable to find the wider ribbon that I wanted and I thought the boxes looked unbalanced with too much unadorned space. Since I had more adhesive trim, I applied another row of the gems above the ribbon to give those boxes a finished look.

Signage


Using this Pinterest image as an example I chose to create a label for the card box with the bride and groom's names, and their wedding date. This was a low key detail. I had designed their wedding invitations using Vistaprint and wanted to use the same fonts and design elements for this sign. I created another draft invite with only this text and planned to print it out and use. However, the ink coverage was not good on the print.


So I taped the printout and some cardstock to the window and traced the text onto the card. It was messy up close but once I added two rows of rhinestone trim for a border it looked much better!

Flowers (nixed)

There was a time when I thought about assembling some fabric flowers as additional decor on the box tiers. This brought me back to the brocade fabric because it mixed the royal with silver, some white, and a darker blue, bringing everything together and I saw it as giving the original basic fabric trio an elegant and opulent feel.


My first thought was as fabric roses or carnations (both used in the bridal flowers); however, the brocade I wanted to use for them started to fray as soon as you looked at it, let alone be manipulated in turns and folds! I changed track to use satin ribbon but couldn't find wide enough satin ribbon in the right blue to make the roses. But if you want to make some gorgeous ribbon roses, here are two instructional sources that I found:

Ribbon Rose Tutorial by The Flower Art
DIY Satin Ribbon Rose by daisyclub23

To be honest, the production of them stressed me more than I needed. In my mind they had to be near perfect and I didn't have the patience for the amount of practice needed for me to be satisfied.

Runners


Luckily, I had other ways to amp up the visual interest. In addition to the card box I had been tasked with decorating and setting up the gift table. I purchased a nine(!) foot long silver sequin table runner from Amazon at the same time I ordered the boxes. It was gorgeous and perfect and would be placed lengthwise on the blue tablecloths provided by the venue. With the box already decorated in cobalt blue, white, and silver; the sequins amplified the bling factor.


This picture of the practice box placed on the silver runner and brocade gave me the idea of using the brocade to construct a runner that would be placed perpendicular to the sequin runner and perhaps hang off the table, with maybe a decorative tassel on the end? I saw this as a means of compromise with the bride, this way the fabric could tie all of the visual elements together yet not be part of the actual box.


My goal was to create this from the 1/4 yard I purchased as a "swatch", I didn't want to buy more fabric and saw this as a way of also justifying that prior expense.

I originally thought I had to figure out how to achieve a perfect point on the ends. Even though a runner is one of the simplest item to make, my fear of messing up this expensive fabric prompted me to look for a tutorial and lucked out with this one by Little House Living that involved NO math or precise cutting! Just four simple seams that I complicated (of course!) by having to not only piece the back for length but by also cutting the back wider to create a contrast border for the front.


After a lot of pressing took place while trying to match the width of the border on each side, I tacked the triangles down in the back and was done. 


Portability


The best advantage to the way I constructed this tower of boxes is that the individual boxes and lids were left separate. They would be assembled at the venue using mini clothespins I purchased over ten years ago, attaching each level to the next one. The sequin runner would be lain down, the brocade runner next, the box tower placed on top, and then the sign would be attached. A picture of this was sent to the bride and the project was...approved!


That structure in the picture above is approximately 10" x 10" and 5" tall, as large as the biggest box, and just like a Russian nesting doll, all the other boxes were stacked inside. There was also enough room inside for both runners, the package of clothespins, the little sign, and extra ribbons and tape. So, so convenient!

I was more proud of this project than I should have been knowing that it had no real use after June 10 but I will look at it as evidence that I never do a (forgive my language) half-assed job on anything!


BME Event Group: Dana & Sean 6-10-17 &emdash;

Compare what I produced to what I was asked to make:


What I learned:
  • I highly support the compact portable option, it was so easy to break down and carry at the end of the night.
  • Make sure your receptacle can be secured somehow or have someone on guard...this can be a lot of money! Of course you should trust your invited quests but what about their plus ones and any temporary event staff?
  • Overestimate how many cards you will receive...their gift table was practically empty with only three wrapped gifts because everything else went into the card box! Making something more like this 2' tall box found on Etsy probably would have been more appropriate:


If you are reading this because you searched for DIY wedding card box tutorials I hope I have helped you or at least led you to some helpful sources. Good luck!

DIY Wedding Card Box Part 1 - Base

Images: BMG Event Group, my own image, DiamondDecor on Etsy, my images, BMG Event Group, jamiekimdesigns and the MadeSoPretty shop on Etsy