Sunday, March 19, 2023

Edwardian Fan Walking Skirt - Simplicity 8747

Finished garment photo coming.

Pattern: 
Simplicity 8747 (2018)

Pattern Description: Misses' mid-length full skirt with a center-front seam and a godet at center back from a vintage-style two-piece suit.

Pattern Sizing: Sizes: 16-18-20-22-24; I cut size 22.


Did it look like the photo/drawing on the pattern envelope once you were done sewing with it? Exactly, it's a simple but classic design.


Were the instructions easy to follow?
They were very easy, but it's important to mark all the marks from the pattern.

What did you particularly like or dislike about the pattern? This pattern works perfectly for replicating my inspiration outfit.

Fabric Used: 
58" Stretch faux suede (90% polyester, 10% Spandex) in Sycamore from Joann Fabrics, Coats All-Purpose 7" polyester zipper in Forest Green, Gutermann 100% polyester thread in Forest Green #792

Pattern alterations or any design changes you made:

Interestingly, the fabric was tough to pin, and I pulled out a size 16 ball point needle to sew it without skipping stitches. However, that bodes well for winter warmth, meaning no cold breezes will get through!

Initially, I thought of making the skirt flared at the bottom or adding more width to the back godet. However, I procrastinated enough that a straightforward sew was best. I didn't get that straightforward so though. The combination of cutting the pattern as 22 instead of 20 and it being a stretch fabric meant that I eventually had to unpick the entire thing, cut it down a size, and sew it up again. Ugh.

After cutting it down to size it fit better but not perfectly. I attached the waistband and instead of slip stitching as I usually do, I followed the instructions and stitched-in-the-ditch of the waistband seam and it worked out beautifully.

The only thing left to do was take care of the very very wide skirt hem. This, of course, I did whip stitch by hand. It probably took 3 hours (over two days) but it looks spectacular. 

Would you sew it again? Would you recommend it to others? I may attempt this again, but would make sure to use a non-stretch woven. As it is, it's quite clingy around the stomach and hips. I'm not sure I know how this should fit. 

Conclusion: I originally envisioned this skirt for a Halloween costume, which wavered between an Edwardian adventuress or a house mistress complete with a chatelaine of keys and tools.


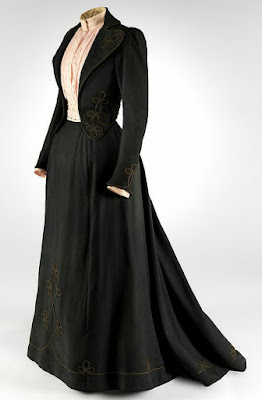
It does match the shape but not the historical look of the inspiration. Perhaps choosing a wool or twill would have been best. To more accurately replicate the look, I may add a petticoat to smooth the lines and allow the skirt to skim my body versus hugging my curves.

Thursday, March 16, 2023

Woodland Magic Lounge Set - Assembly Line Pyjamas

Pattern: Assembly Line FREE Pyjamas pattern (2022)

Pattern Description: A two-piece loungewear set consisting of a short-sleeved top with a wide neckline and relaxed fit shorts with an elastic waistband, and side seam pockets.

Pattern Sizing: Sizes XS to 3XL, I made a Medium top and a Large in the shorts.

Did it look like the photo/drawing on the pattern envelope once you were done sewing with it? Yes, it looks exactly like it!

Were the instructions easy to follow? Definitely, in fact, the instructions were excellent.

What did you particularly like or dislike about the pattern? I was looking for an easy shorts pattern but after I saw all the cute flannel and jersey prints available, I thought of making the entire set as sleep or loungewear. I normally just sleep in a random t-shirt and add leggings once I wake up. However, with these, I have an entire cute outfit. Best yet, they were designed with roomy pockets.


Fabric Used: 58" Pop! Fall Mushrooms lightweight fleece (100% polyester), Gutermann 100% polyester thread in Ivory, #800, Pellon Sheer-Knit fusible interfacing, 58" Pop! Forest Green Fox interlock (98% polyester/2% Spandex), 1" elastic, Gutermann 100% polyester thread in Deep Burlywood, #791.


Pattern alterations or any design changes you made: Seeing examples on the web and reading reviews showed that the neckline was wide. However, even though I reduced the width by 1/8-1/4," it still could use less width as you can see in the last picture below it tends to shift from side to side. Remember though, if you shorten the width, make sure you can still get it over your head.


The shorts could easily be a smaller size, or the legs slimmed down a bit, because they are quite roomy.


Would you sew it again? Would you recommend it to others? Yes, definitely, not only is it cute, but the pattern is FREE! What's not to love?


Conclusion: I am already eyeing some more cutesy prints (in knits and crisp cottons) for spring and summer sets. One thing I really appreciate about the instructions is that they have you finish all the seams, secure the pockets, and have you prepress all the hems before any side seam construction. Those steps result in a neat and elegant finish, inside and out.

Thursday, January 26, 2023

Navy Knit Bootcut Pants - Vogue 1663

Completed in 2022.

Finished garment photo coming.

Pattern: Vogue 1663 (2019) 

Pattern Description: Misses' Jacket, Top, and Pants: Pull-on pants have a self-lined yoke with hidden waist elastic and topstitched hems.

Pattern Sizing: Y(XS-S-M), ZZ(L-XL-XXL) I cut an XL, which was the closest to my measurements.


Did it look like the photo/drawing on the pattern envelope once you were done sewing with it? Yes, it did. 

Were the instructions easy to follow? Yes, very much so!

What did you particularly like or dislike about the pattern? The yoke construction is similar to one from my favorite knit skirt, Butterick 6464. It is meant to have the convenience of a gathered waist without excess bulk around the waist and hip. I also love the slight bootcut shape of the pants leg.

Fabric Used: Navy cotton interlock (from a 2016 Hancock Fabrics liquidation sale!), Dritz 3/4" wide braided elastic, Gutermann 100% polyester thread in Navy #272.

Pattern alterations or any design changes you made: I decided to compare the leg shape to two similar patterns in my stash, Simplicity 1283 and Vogue 8963. I was initially going to make one of those and add the yoke from B6464. This just made it so much easier!

The instructions have you sew double seams, so I needed to first baste the pants together to see how they would fit. This is hard to see without the waistband, so I decided to leave them as-is, baste on the waistband, and then reevaluate them.

I pulled out the elastic template and noticed that the measurement for size XL was too long. Size XL should fit a 34"-37" waist, but the elastic length for XL would be 40." Ridiculous! The same formula was used for the other two sizes in the packet. I did not trust their installation method. Instead, I adapted the technique from Butterick 6464 and cut my elastic to my waist measurement, 36" (also the length Vogue 1663 said to cut for size L!). I cut off 1-2", making sure it could comfortably stretch over my hips. That was the right call.

Once the waistband was in place, I could evaluate the fit. The front rise was 1/2" too long while I would want to add at least 1/2" to the back rise, which seemed (exposing underwear when bending over) low. The width of the legs was fine, but the length was ridiculous, 3 inches too long! This means that the knees can't possibly be in the right place, so the shaping could be better, and this will need to be altered on the paper pattern for any future pants.

I noticed when I took the pants apart that the fabric had stretched. Choosing a cotton interlock for pants might not have been the most sustainable choice. I had to recut the side seams and even out the pants legs to the original length before I cut 1-1/2" off.

Like the XL waistband, I think the pant legs were too large (or stretched out) because I ended up recutting the legs between the size XL and the size L. I will also need to alter the yoke pattern, which I thought was too wide. Next time, I will also cut a size L.

I trimmed down 1/2" at center front, tapering out to nothing at the side seams. In future pairs, I will do the same and add 1 /2" to the center back piece.

Would you sew it again? Would you recommend it to others? Yes, I would recommend this pattern for the pants even though I didn't use their elastic insertion method. I liked the use of a yoke to minimize elastic waist bulk and the flared shape of the legs. However, in my future makes, I need to use appropriate fabric and make alterations to this pattern.

Conclusion: These pants will be paired with McCall's 7254, a jacket I made in this same fabric five years ago! I had meant to muslin Vogue 1411 in this fabric instead. However, I'm still intimidated by that pattern, so instead, I've created a casual and cozy knit suit.

Tuesday, January 24, 2023

Hug It Out Pullover - Hug Hoodie Madeit Patterns

Completed in 2022.


Pattern:
 Hug Hoodie by Madeit Patterns (2020) (OOP)

Pattern Description: Relaxed fit sweatshirt with raglan sleeves, overlap neckline detail, curved back hem, and an optional hood.

Pattern Sizing: UK sizes 6 to 20, I made a size 16.


Did it look like the photo/drawing on the pattern envelope once you were done sewing with it? It looked exactly like the pattern images and drawings.

Were the instructions easy to follow? So simple and very beginner sewist friendly.

What did you particularly like or dislike about the pattern? The curves at the bottom remind me of similar RTW details I've been interested in for a few years but never got around to drafting for myself.


Fabric Used: 58" anti-pill plush fleece (100% polyester) in Pineneedle and 58" Sew Classics interlock ( 60% cotton, 40% polyester) in Ponderosa (for the hood lining) from Joann Fabrics, Gutermann 100% polyester thread in Forest Green #792.


Pattern alterations or any design changes you made: Checking the final garment measurements, I noticed that the pattern was made for a personal height of 5'6". Accordingly, I shortened the body and sleeve pattern pieces 2" using the shorten/lengthen lines.

While truing the altered pattern pieces, I added more ease in the lower arms so I could push up my sleeves. That was a good call because I could barely try on the cuff pieces. This makes sense since the pattern did suggest cutting them from ribbing! However, I found that the cuffs make the arms super long. So, I could cut new wider and shorter cuffs or go without the cuffs completely. I decided to baste them on, wear them for a while, and see if they needed to be altered.


I used a remnant for the hood lining; it's not an exact color match, but close enough. I liked how it came out, and the pattern cleverly provided a way to add a drawstring if you wanted to add one.


The neckline was surprisingly small, which made it a tight fit once you attached the hood. The pattern does not address the stress point where the hood edges overlap. As it is a tight squeeze, this area will need reinforcement. I will add a binding to this front edge similar to the back neck.


Everything else went easy; I especially loved how clever the faux wrap hem binding is constructed. Easy-peasy.


Would you sew it again? Would you recommend it to others? I will probably make it again in a pattern with the other neckline or with some color-blocking. I recommend it as a wonderfully simple-to-construct sweatshirt pattern but with design details that make it versatile and unique.


Conclusion: I am glad I made the alterations I did, although they were not perfect. Removing 2" from the length of the body was too much for a cold-weather garment. It is now too short in front to cover the waistband of my pants and skirts. However, it was too long in the back with a lot of excess fabric, so I removed the back binding, shortened the back a total of 1", and straightened the curve. I also slimmed the sides by 1/2."

Though the cuffs were roomy, the lower arms were still too tight to push up my sleeves, which meant the overlong cuffs now get wet when I wash my hands. Besides fine-tuning those changes, I will also enlarge the neckline by 1/2" and the hood's width by an inch to create a more substantial overlap. Otherwise, it's a great design that just needed adapting for my body.

Saturday, January 21, 2023

Everyday Dress - In the Folds/Peppermint Magazine

Completed in 2022.


Pattern: 
Peppermint Magazine Everyday Dress (2020) A collaboration with In The Folds patterns.

Pattern Description: Knee-length oversized reversible dress. One side of the dress has a soft v-neck, and the other has a round one. The dress features relaxed body sleeves, in-seam pockets, hem slits, and an optional waist tie belt.

Pattern Sizing: 
Sizes: (1-2-3-4-5) I chose size 3.


Did it look like the photo/drawing on the pattern envelope once you were done sewing with it? It looks exactly like it!

Were the instructions easy to follow? Yes, very. I think a beginner could tackle this with a video tutorial for the hem-facing section.

What did you particularly like or dislike about the pattern? I liked the simple design. It was also a quick make; I completed it in about six hours.

Fabric Used: 54" Linen-look fabric in Navy (55% linen, 45% rayon) from JoAnn Fabrics, Gutermann 100% polyester Sew-All thread in Eggplant #943

Pattern alterations or any design changes you made: The pattern is meant for 58"/60" wide fabric. However, I used fabric bought initially for another project. It was long but only 48"/54" wide, so I had to cut the sleeves to size 1 sleeve length. They ended up perfect, right at the crook of my elbow. I shortened the dress two inches since it was drafted for a 5' 7" tall person. 

The dress is meant to be comfortably oversized, but I am two different sizes and was worried the hips might end up too tight. I marked out from size 3 under the bust to size 4 at the bottom. It worked. I might not have needed to do that (it only added an inch total), but I feel secure that this dress will last longer because of this addition.


Would you sew it again? Would you recommend it to others? I can see more of these with different sleeves and hem lengths. Though the pattern was free, the instructions were thorough and easy to complete. I would highly recommend this pattern.


Conclusion: I am pleased with this dress and how quickly it was constructed. It's a relatively simple design, but the faced hem slits and the reversible nature of the dress elevate it. This dress could also be radically transformed using different substrates, colors, and patterns.

Wednesday, January 18, 2023

Wide-Strap Maxi Dress - Elbe Textiles/Peppermint Magazine

Completed in 2022.


Pattern:
 Peppermint Magazine Wide-Strap Maxi Dress (2021) - A collaboration with Elbe Textiles.

Pattern Description: A-line maxi dress with wide shoulder straps, faced side splits, and an elasticized back.

Pattern Sizing: Sizes (A-J) I cut out size F.


Did it look like the photo/drawing on the pattern envelope once you were done sewing with it? Exactly!

Were the instructions easy to follow? Yes, they were. 

What did you particularly like or dislike about the pattern? It looked like the most comfortable but streamlined version of a summer caftan, but with some structure.

Fabric Used: 43" Robert Kaufman Essex linen blend in Crimson (55% linen, 45% rayon) from Fabric.com, Gutermann 100% polyester Sew-All thread in Chili Red #420, Crimson #347, and Dritz 1-1/2" soft waistband elastic.

Pattern alterations or any design changes you made: As the pattern was meant for a person taller than me, 5'7", I thought I would need to shorten the dress by three inches, but when I held the pattern up to myself, I liked the length. 


Even though I matched the pattern measurements, I was still scared of creating a dress that didn't fit, especially one made with French seams.  I held up the pieces at each step, checking to see them compared to my body. Once I tried on the basted dress, I was reassured that there was plenty of room for my hips and that the darts were in the correct location.

Looking at the written instructions, I thought constructing the slits would be difficult. This was warranted because when it came to the second pass of the French seamed sides, I wasn't sure how the side split would fit in and doubted myself. I ended up scrolling Instagram and enlarging every photo of other sewists' versions to see how their dresses looked in that area. 

Unfortunately, none looked as weird as mine, so I separated the seams and started over. I chose to sew it with a regular 1/2" seam allowance and use a faux flat-fell finish. This fulfilled the pattern's goal of a clean inside finish. 


Would you sew it again? Would you recommend it to others? Yes, I think I would; it's a great design. I can see sewing another one in a more fluid fabric.

Conclusion: I love this dress, but it had some fit issues. The shoulder straps were unwieldy and need adjustment, they slip all over the place. I need to add the bra strap holders (which were included in the instructions) and that will fix the problem. 

Sunday, January 15, 2023

Whistle While We Work - Elizabeth Suzann Clyde Work Pant

Completed in 2022.


Pattern:
Elizabeth Suzann Clyde Work Pants (2021)

Pattern Description: Pull-on pants with large crescent-shaped pockets spanning the side panels (of a three-panel design), vertical seams down the center front and back of the legs, and a wide elasticized waist.

Pattern Sizing: US Sizes 000-28/XXS-4XL in three length options; I cut out a size 16 in the Regular length.


Did it look like the photo/drawing on the pattern envelope once you were done sewing with it? Exactly!

Were the instructions easy to follow? Yes, very much so!


What did you particularly like or dislike about the pattern? The pockets and the room around the hips are what intrigued me. I love how the shape tapers down to a slimmer leg.

Fabric Used: A mystery twill with some Lycra content from my long-term stash, Dritz 2" soft waistband elastic, Gutermann 100% polyester thread in Deep Burlywood #791 


Pattern alterations or any design changes you made: I made no changes to this pair and sewed them according to the instructions. The procedures allow you to do almost all the top stitching except at the inseam, where it wouldn't be noticed. The only problem I encountered was at the inseam, where I had to ease the seam at the cr@tch, probably due to the stretch in the fabric causing some distortion.

I noticed that if you use the 2" elastic and fold down the waistband the two times as instructed, it seems to leave almost no space between the elastic and the top of the pockets. I even bought 1-1/2" elastic just in case. 

I cut the elastic to 34", two inches shorter than my waist measurement, hoping it would work.


Unfortunately, the cr@tch was about two inches too long between the front and back! In addition, the waist was loose. I eventually had to unpick all four rows of waistband stitching and the seam. I then folded down the waistband one more inch, as far as I could without interfering with the function of the pockets. I sewed a 2" channel for the elastic, and once I pulled it through, I overlapped the elastic another inch.


Would you sew it again? Would you recommend it to others? Yes! I loved the design of these since I first saw them years ago. I couldn't wait until the pattern was released. I recommend this pattern and stress the importance of using the pattern's measurement chart and determining the preferred rise (i.e., cr@tch seam) before choosing which Length version. I assumed wrong; instead of Regular, I should have gone Short and lengthened the legs to make the difference.


Conclusion: I will definitely make these again. I love the silhouette! Next time, I will use stronger, slightly more rigid elastic, remove two inches of length from the rise, and add two inches to the length.

Saturday, January 14, 2023

Pocket Skirt - Thread Theory/Peppermint Magazine

Completed in 2022.


Pattern: 
Peppermint Magazine Pocket Skirt (2020) A collaboration with Thread Theory Patterns.

Pattern Description: Relaxed midi-length skirt with a wide gathered waistband and oversized panel pockets.

Pattern Sizing: In sizes 6-28, I cut a size 18.


Did it look like the photo/drawing on the pattern envelope once you were done with it? It looked exactly like the pattern picture.

Were the instructions easy to follow? Extremely. I was able to make this up in two evenings after work.


What did you particularly like or dislike about the pattern? Of course, the large, purposely droopy pockets were the draw, along with the gathered waistband.

Fabric Used: 52" Robert Kaufman Brussels Washer linen blend in Brown (55% linen, 45% rayon) from Fabric.com, Gutermann 100% polyester Sew-All thread in Chocolate #578, and Dritz 1.5" heavy stretch waistband elastic.

Pattern alterations or any design changes you made: The pattern was designed for a 5'7" person, so I immediately cut off 2 inches from the center front, center back, and 2 inches from the lower side panel. There is a line to shorten or lengthen where the pocket goes, but I could not figure out how that would work. As it turned out, I still had to remove an inch from the side panels after it was stitched. I assume this was my fault and my calculations were mixed up somewhere.

They suggest you cut it out on a single layer of fabric, so I used Easy Pattern paper to turn the half pieces into whole ones to make cutting them out easier.


Would you sew it again? Would you recommend it to others? Yes, I would and will make it again. I also highly recommend this pattern to others. Why not? It's free, easy, and looks great!


Conclusion: The most important thing that came out of this make is that I love Brussels washer linen. The weight, drape, and feel make the perfect summer fabric for swishy skirts and cool breezy linen shirts.

Friday, January 06, 2023

Sewing Machine Update

Late last year, I finally bought myself a new sewing machine, a Singer Quantum Stylist 9960. It arrived a few days after I wrote this post detailing how I chose that particular machine. 

Even though I had several days off over the holidays, I only tried the machine on the last day before returning to work. Why, you ask? Well, I didn't feel like it, which was weird. I mean, it was a new purchase that I had been looking forward to, and I had a skirt I wanted to finish before the end of the year. Was it a sign? 

So, that day, I used the bobbin winder and the automatic needle threader according to the instruction video developed by Singer. I started sewing, and the upper thread tension was horrible! Also, the built-in thread cutter only cut 1 of the 2 threads. 

Thinking it was my fault, I started over again and threaded everything from scratch, and it still did not improve. This machine advertises self-adjusting tension, so I was stuck without the option to  adjust it manually. 

Frustrated, I put the machine aside and pulled out my trusty thirty-year-old Baby Lock BL2100. After threading it, the problems I had before (skipping stitches) were all gone. I also noticed how different this machine felt; solid and sturdy. Many plastic parts on the Singer seemed fragile like they could easily snap off, such as the bobbin case cover release button.

Baby Lock Jubilant

I will give the new Singer another try this weekend, but if there is no improvement, it is going back. I now know buying a machine without trying it is not right for me. I returned another machine thirty years ago before buying my BL2100. So, I plan to take a Baby Lock Jubilant for a test drive at my local Baby Lock dealer. Wish me luck!

P.S.

The Baby Lock website allows you to download their user manuals. It's a great sign that the manual is well done, with excellent illustrations and an intuitive content layout. It turns out that Singer needs those instructive videos because their manual is a mess.