Showing posts with label alterations. Show all posts

Tuesday, November 03, 2020

Big Bad Floral Wrap Dress - New Look 6301


Pattern:
New Look 6301 (2014)

Pattern Description: Misses' mock wrap dress has slim or flared skirt, several sleeve optionsand three types of waist treatments (tie, no tie, band) with an elastic casing at the waist. A Just 4 Knits dress. I made View A.

Pattern Sizing: Size A (8-10-12-14-16-18-20) I cut a size 18 bodice, no alterations, to begin with...


Did it look like the photo/drawing on the pattern envelope once you were done sewing with it?

Were the instructions easy to follow?
Yes, fairly simple.

What did you particularly like or dislike about the pattern? The finished garment pictures of this dress look great, and at the time, this was the only wrap dress pattern I could find with a fuller skirt.


Fabric Used: 57" double brushed knit in Multi Shana Floral (97% Rayon, 3% Spandex) from Jo-ann Fabrics, Gutermann 100% polyester Sew-All thread in Claret #440 and Copenhagen #933.

Pattern alterations or any design changes you made: After a few pattern reviews from (Sewsarahsmith and Sew-To-Fit), I decided to take their suggestions and do the following: I added length, about 4" to each of the waist ties. I also shortened the neckband by an inch to eliminate any possible gaping in the neckline.

Printed off-grain

What I didn't expect was that my fabric would continue to stretch. By the time I basted the skirt to the bodice, it seemed to have stretched out more than three inches. Luckily, I had only basted the side seams, so I took the dress completely apart, compared it to the pattern pieces, and recut. Even the armholes had increased in size!

Waist is much lower than it should be.

I cut an inch off the skirt length. Then I shortened the bodice length by 1/2." I would have liked more but didn't want to interfere with the darts at the side waist. Both the side and shoulder seams lost about 1/2", subject to me trying it on again. I also shortened the neckband piece; since everything else had stretched out, I can only imagine that the neckline did too.

I took great care not to stretch the fabric further. After a series of Big 4 pattern sleeves being too tight on me, I cut these a size larger in width, keeping everything else the same. However, I ended up sewing the sides at 6/8" when they seemed too loose. In addition, the excess ease was ridiculous; the sleeve caps are essentially gathered. I knew then how completely OVER this dress I was since I didn't try to fix it. I needed to hem it and then put it in the magic drawer (won't be hanging this one!) until I forget all about this frustration!


Would you sew it again? Would you recommend it to others? I still love the pattern's look and will attempt it with a more stable knit next time.


Conclusion: This dress will be worn nonetheless. Well, until it stretches itself out beyond recognition! Unfortunately, it will not function as a muslin because I have no idea what the true fit and ease of this pattern are because of this fabric's low quality.


Historical note: Photographed after voting early, October 2020.

Sunday, April 15, 2018

Update on That Toaster Imposter Sweater

A month or so ago, I made Simplicity 8529, a Sew House Seven design that is an adaptation of their popular Toaster sweater. I wasn't exactly happy with my finished top at the time (the print is so loud, it practically screams!) but it was well made and the cold weather required this extremely cozy piece in my wardrobe.


But that didn't last long. I wore it 2 times and contemplated wearing it a few other times but each time felt I was drowning in fabric and the view of all that fabric when I looked down at my chest was just too much. Combined with the top being at least one size too big width-wise, I felt like the Stay Puff Marshmallow Man. A re-fashion was desperately needed.

Short of unpicking all of the seams and re-cutting the pieces in a smaller size, I did two things:


1. I removed the bottom band, opened it up, and only attached one side of it. I then hemmed one inch on the bottom, retrieving approximately two inches of length. Because of the dropped shoulder on the top I originally had underestimated how high the sides would raise when the arms were lifted.


2. I completely changed the neckline. I originally cut down two inches thinking I would try to copy the shallower neckline of the Toaster but that wasn't satisfying either. I then started cutting the neckline down bit by bit eventually coming up with a wide crewneck. I decided against adding a neckband or a binding and simply turned the edge under 1/4".


Obviously, next time, I probably won't make this view. In my current shape, I'm not happy with the wide look of a drop shoulder, preferring to have tops that fit more snug at the bust even if they become oversized below that point. To alter that I would need to cut the sides considerably and cut new longer (and wider) cuffs to make up the missing length. Maybe I'll do that before next winter.

Wednesday, June 07, 2017

Mod Double Knit Ponte Dress - Simplicity 5289

Pattern: Simplicity 5289 (1972)

Pattern Description: A-line dress with back zipper closing has French darts, high round neck, and short raglan sleeves.

Pattern Sizing: Pattern is size 14, though my waist and hip measurements corresponded with their size 16.


Did it look like the photo/drawing on the pattern envelope once you were done sewing it? Yes, pretty much, except the neckline is a bit lower on my version.

Were the instructions easy to follow? Yes, extremely easy.

What did you particularly like or dislike about the pattern? It's easy, perfect for a quick, cute make. It has a very forgiving shape. However, I had to make adjustments in order for it to fit the way I desired.


Fabric Used: 1-3/4 yards green double knit from VA/DC/MD swap (where I also got the pattern!). This is a medium-weight fabric with minimum stretch. Gutermann polyester thread in Spruce #784 and a 3/8" button from my stash.

Pattern Alterations or any design changes you made:  I knew that the round necklines of the 60-70s were worn high and I might have to lower the neckline so I created a quick muslin of the dress (waist-up only) to check that, the fit of the shoulders, and the armscye. The neckline was extremely high to the point of near choking. Note that my muslin was made from a former twill duvet cover while the final dress would be in a double knit so the actual result would still be a mystery.

Otherwise, I was extremely surprised by the good fit of the muslin. The armholes for the raglan sleeve hung a bit too low for full mobility but otherwise, the darts were in the correct place and the shoulder shape was near perfect.

The bodice fit perfectly but the size 14 was meant for a waist and hip 2 inches smaller than mm actual measurements so I thought I needed to add some width to the pattern at the side seam. In the end, I ended up removing the additional width and in fact, increased all of the darts considerably to bring the fit in closer.

Despite the pattern illustration, according to the pattern envelope, the finished dress length was meant be 42", most definitely a 1970s "midi" to "maxi" length. I ended up removing 6 inches (!) and then doing a 2-1/4" hem. 


One thing I really enjoyed while making this dress was all the hand basting that I did, it was very relaxing, and didn't take that much time. If you desire stitching accuracy, basting by hand is a necessity. I even basted in all of the darts, dart legs and all, so I could machine stitch exactly on the lines.

Here is the dress during my first fitting:

Shoulder shape is looking good!

Unfortunately, the perfect shoulder shape was the only good thing about the fit of the dress. I had a lot more work to do to achieve the look of my inspiration dresses (see other construction links at bottom of this post).


I ended up cutting the neckline lower, more at the sides than at the front to correct the patterns vintage look and stifling feel. At first I had planned to bind the neckline but scared of bulk and any possible stretching I chose to just turn the seam allowance under and topstitch. I'm very happy with how that turned out.

Even though this is a stable knit, I still finished all raw edges with a zigzag for neatness and hemmed it by machine, doing two rows of stitching (faux twin needle) at the skirt hem.

Still some swayback issues but I'm fine with it.

I love these French darts.

I chose not to install a zipper, scared that it would stretch out the fabric or not lay flat. Instead I did a simple button closure following an awesome thread button loop tutorial from the Tessuti blog. It turned out so simple and elegant looking.

Would you sew it again? Would you recommend it to others? Even though I AM in love with the final dress, probably not. I'm not sure I would be able to forget the frustration and time spent trying to finally get the dress I originally imagined. I'm also not sure I transferred all the changes to the paper pattern during the process. F.Y.I. I suggest that anyone attempting a vintage pattern like this one definitely make a muslin, or two.


Mad Men season 7, episode 3
Stella McCartney "Ridley" dress

See? I swear I didn't pose like the pictures on purpose. Also ignore my food baby.

Conclusion: I knew this was a perfect marriage of pattern and fabric to attempt a version of my inspiration dresses; a dress worn by Elizabeth Moss as "Peggy Olson" on Mad Men's final season and a similarly shaped dress, the "Ridley" dress by Stella McCartney as worn by Catherine, Duchess of Cambridge. I wanted a simple dress design that would result in pure comfort, fully taking advantage of this cozy fabric and this design succeeded. In the end, I chose not to do the contrast topstitching, but it's something I can always do later if I change my mind.

More Of My Mad Mod Ponte Dress
My Mad Mod Ponte Knit Dress In Progress

Images: My own photos, AMC, Media-Mode.com, whatkatewore.com

Tuesday, December 27, 2016

Winter White Twist Top - Butterick 5429

Pattern: Butterick 5429 (2009)

Pattern Description: Long sleeve top with front neckline twist, dropped shoulders, and stitched hem.

Pattern Sizing: Size BB (8-10-12-14) I made a size 8 after noting when I made it before that the pattern ran large.

Did it look like the photo/drawing on the pattern envelope once you were done sewing with it? Not really, as it was not as fitted as the illustration would have you believe.

Were the instructions easy to follow? Yes, very.

What did you particularly like or dislike about the pattern? I was intrigued by the twist detail at the center front. I liked the idea of a very simple top but with interest. However,  when I made the pattern the first time I found the pattern illustration deceiving. The top did not have a close fit at the waist, in fact, it resembled a square with no waist shaping.

Fabric Used: Ponteroma knit in Winter White for $3 per yard (orig $15) from Hancock Fabrics liquidation sale.


Pattern Alterations or any design changes you made: Because I have made this before, I used a altered pattern closer to a size 8, actually two sizes smaller than the pattern would have me make according to my measurements. However, since I was also making this in a stable ponte instead of cotton jersey like the last top I added 1/4" to each width-wise seam when I cut it out.


This is the second time that I've made this top so I have an adjusted pattern now. However, if you are working from the original you may wish to remove some of that extra fabric hanging beneath the twist. I suggest you scoop out the front seam, curving in from the bottom of the open twist to one inch at the middle and and then back out to the hem, blending out to the original seam.

I found it much easier to hand stitch the twist loop edges because they would show when wearing.

Would you sew it again? Would you recommend it to others? Yes, with my adapted pattern this is now one of my TNT patterns. I have now made it in three different fabrics; nylon/spandex blend, cotton jersey, and ponte. I still recommend it to others because of the design but strongly suggest that a muslin be made first.

This could also be quite interesting with a different color, a sheer fabric, or a similar but different sized print in the upper bodice/sleeve area.

Conclusion: An easy but interesting top that can be had if you are willing to do a little work.

Friday, November 18, 2016

Working On The Duster Trail...with New Look


The image in my head for the last six years.
In 2010, decided to make a duster coat to enhance my professional wardrobe and wrote about my goal here. I even tried to muslin the coat at the time. If you remember (HAH, I barely remember, it was 6 years ago!), my original pattern choice of Vogue 7714 was much too large for me, even after coming down a few sizes. The photograph of the view I wanted was extremely misleading (though you could see the truth in the others) and the actual wearing ease on that pattern was ridiculous! It was so large that I was able to reuse and cut another pattern out of those same muslin pieces! I needed some more fabric only because the new pattern had two back pieces instead of one. I tried it on and it looked good even though the bust darts were in a very awkward position.

I really liked that pattern, New Look 6656, and every 5 months or so, I would try it on again and still be happy. However, I could never get myself motivated to cut it out of my final fabric, a polka dot moleskin, which I think over time developed mythic status in my stash. In the mean time, I gained weight and inches and that muslin became no longer relevant.


So, just a few weeks ago I cut that old pattern New Look 6656 and another new option, New Look 6270, out of a queen size sheet with the goal of completely finishing the duster THIS year.


The illustrations above (an altered New Look 6656 sketch) are what I wanted the final garment to look like and include the must-have details: an a-line shape, collarless, no closures, bust darts, waist definition, a back seam for sway-back shaping, and a length about 30-32" from base of the neck.

Each of these two patterns more or less had these details but the shaping of some elements were different (like the side and back seams) and that was the reason I needed to make them both up to see which would work better.

In both patterns, the front armholes were identical and the sleeve pieces had the same general shape and cap height.Though both patterns had back seams they had some room added to the upper back that seemed to allow for a slight dowager's hump. If anything, my back would require a straighter line there. Perhaps my posture is more erect than the average woman because both muslins bagged out unattractively in that area when sewn up as designed.

New Look 6270 was shown on the pattern cover in a sheer fabric; therefore, the picture was not a good indicator of its suitability for my fabric, a more substantial moleskin print. Using the printed pattern measurements I cut it first as size 16 all-over, eventually coming back to reducing everything above the waist to a size 14. Even then, the front and back were extremely wide. In fact, the front lapels overlapped by inches when there was no overlap intended in the design.


To see video of this jacket in motion, check here on my Instagram.


As you can see, altering this pattern to fit my goal of a sleek jacket would have been too much of a job. I'm still a fan of the maxi-dress in the pattern so I hope its sizing and ease will be more accurate.


New Look 6656 had a more structured design allowing for facings; however, the illustration made the shoulders seem like they might be too wide. I cut this one in size 14 at the shoulders moving out to a size 18 at hips. Comparing the pattern pieces, New Look 6656 was more nipped in under the bust; however, like 6270 it also allowed for a strange protrusion at the upper back (see at right). I cut that off leaving the back straight above the slight swayback shaping. I found the back neckline uncomfortably high on my neck so also ended up cutting the neckline and facings in a size 12.


To see video of this jacket muslin in motion, check here on my Instagram.


This muslin in motion* fit much better, I found the shoulders fine, the back was not too wide and there was adequate ease for the hips and bum. The sleeves for this design were meant to be cropped or otherwise extended with a contrasting cuff. I added the cuff to the main sleeve pattern piece and cut my sleeve out at full length.


As you can see, the muslin worked out beautifully and matches the shape of the inspiration garment shown below by Calvin Klein.
Calvin Klein colorblock jacket
I can't wait to cut my long-stashed fabric and sew this beauty up. It's been a long time coming!


*I was trying this on during the last week of the Presidential campaign and as my father filmed me we could not miss how much this jacket resembled the similar ones worn by Hillary Clinton. Sigh.

Wednesday, October 26, 2016

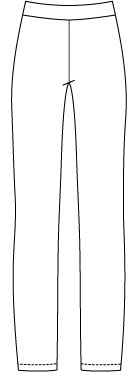
Stretch Pant Trial Run - Style Arc Barb's Stretch Pant

Pattern: Style Arc Barb's Stretch Pant (2014)

Pattern Description: Pull-on pant with elasticized waistband made in a stretch woven.

Pattern Sizing: Size 12-14-16. I cut the size 14 (W: 33.5 in. H: 42.5 in.) and made some changes to the pattern.

Did it look like the photo/drawing on the pattern envelope once you were done sewing it? Yes, exactly. However, mine were a touch too small!

Were the instructions easy to follow? Extremely! This is a very simple pant which makes it ideal for trying to nail down what kind of fitting adjustments you may need to make to pants in general.


What did you particularly like or dislike about the pattern? Most importantly, the company offered it as a FREE PDF download here. This allowed me to try out the company's pants draft before making a monetary commitment. Two, this seemed like a very simple pattern, no zipper insertion, or lined waistband.


Fabric Used: Cream stretch suiting (95% polyester 5% Lycra) from Jo-Ann Fabrics on clearance, Dritz 2-inch wide knit elastic.

Cut and spread to add room for the stomach
Pattern Alterations or any design changes you made: Current sewing situations have taught me that it wouldn't hurt to do a full tummy adjustment and a protruding seat adjustment when making pants so I first made a tracing of the pattern for my muslin.

Page 57 of Sewing Pants That Fit.

I added an inch wedge to both the front and back just to be safe. As it turns out, perhaps a full inch at front was not necessary.


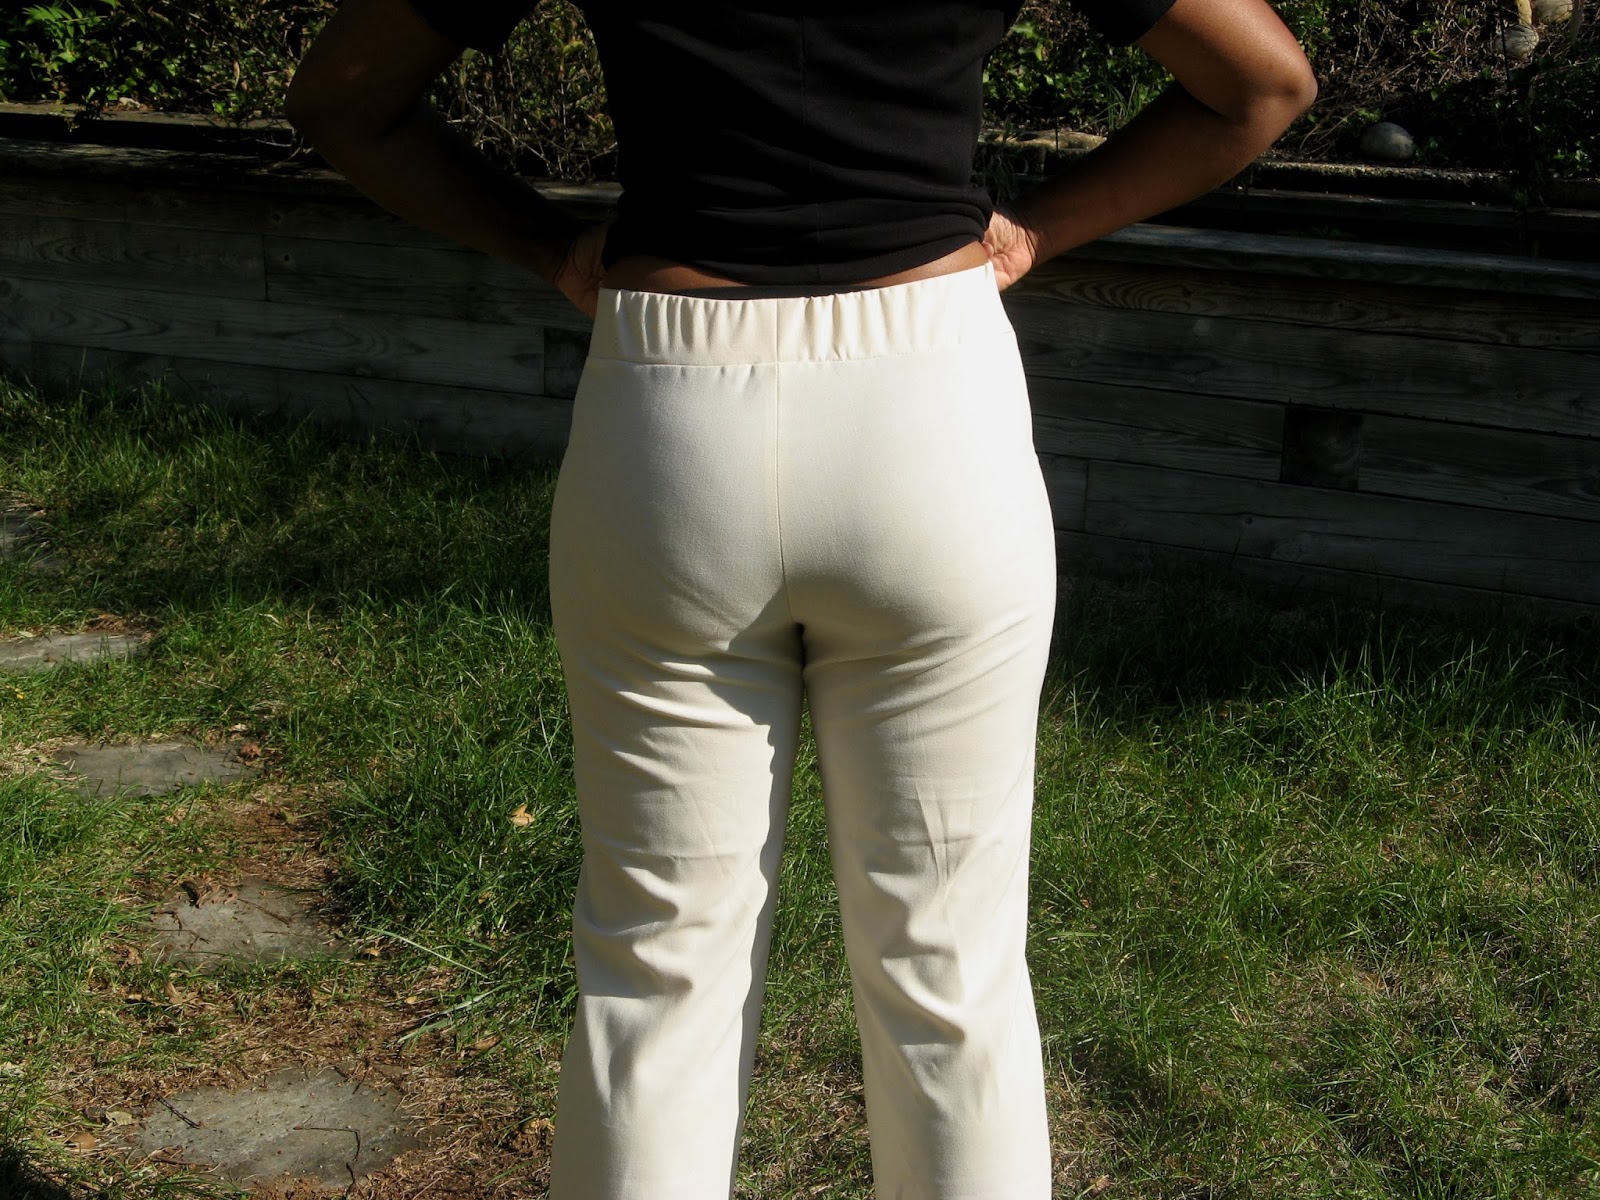
However, the adjustment at the back was perfect and I like how the ole bum looks. I believe the wrinkle problem there in back is because my inner thighs need more width so I will add a full thigh adjustment to the front for the next muslin.


A plus of the pattern draft is how they handled the waistband. Note the angle from the top of the waistband down. This shows an awareness that this is a wider than usual waistband and that the body is going to widen out from that top point but that you still want a slim as possible waist.

Note the angle of the waistband at the sides and how it meets the pants.

When I first saw this waistband sewn up and placed next to the pants in the image above I doubted that it would fit over my hips. However, being cut the way it was it expanded the right amount to fit the pants, even before any elastic was involved.


The elastic was placed inside the completed waistband and basted closed before it was attached to the pants. This allowed the elastic to fit snug in the casing and eliminate any excess room that would allow it to twist around inside the casing.

Not loving this view!
Here is the finished muslin from the side. Note the protruding abdomen, (and then feel free to forever abolish the image from your brain!) the tautness of the fabric below it, and that crooked side seam. This muslin is too small. All of these pictures were taken months after the pants were first completed. At that point, they were really too small. I have since lost some weight and dietary changes have somewhat adjusted my abdominal bloat, so there has been a great improvement to that original fit. Unfortunately, the picture is so washed out but you may be able to see where the side seam indicates where more width in the pattern is needed. Try hard you can also see the beginnings of those diagonal wrinkles towards the back indicating the need for the full thigh adjustment.


The view from the front is where you can see the high waist and how they fit at the front thigh with a few radiating markers of fitting issues. Also note that once on, despite the 10" difference between my hips and waist, the amount of visible gathers from the waistband are minimal and don't add too much bulk. So the waistband works, but the rest of the pants do not.


Last little note, since these were never meant to be finished, I cut almost 4 inches from the length in order to try them on. I am 5' 4" inches tall, so definitely compare your desired pant length against the pattern pieces before laying and cutting out your fabric. I would hate for you to lose that much fabric needlessly.

Would you sew it again? Would you recommend it to others? Since this is a muslin, the real question is will this pattern work well enough for a final version? I believe so, with a minimum of changes. The waistband is a keeper and the use of 2" elastic creates a comforting and supportive waistband; especially if you have some girth you wish to control in that area.

Unfortunately, my muslin did not fit, but then that's the purpose of a muslin. I don't know how much can be blamed on the fabric choice since the Lycra content of this particular fabric was a mystery and I did not know exactly how much* stretch the pattern required. According to the company's posted measurements (waist: 33.5, hip: 42.5) I did choose the right size and in fact, those numbers are 1" larger in the waist and .5" in the hip. However, my full abdomen and inner thighs may have affected the ease distribution.

Conclusion: I will make these pants again and not only to adjust and correct the pattern before attempting the other two Style Arc pants patterns I own. This was a more than decent muslin compared to other pants patterns I have tried. If I hadn't made them out of a see-through white fabric I could even see finishing them off and wearing them out on my "no bread and dairy" days.

*Instead of suggesting a Lycra/spandex content percentage, Style Arc instead directs you to purchase their own stretch gabardine that possesses a 30% vertical stretch (?).